Applying thermal paste is one of the most crucial things you'll do while building a PC. The paste, also known as the thermal compound, is applied to the top of the CPU's Integrated Heat Spreader (IHS) to fill the air gaps that are formed due to the microscopic imperfections on the surface of the IHS and the metal base of your CPU cooler. The paste essentially paves the way for a more efficient heat transfer and keeps the CPU's operating temperature under the acceptable limits. Simply put, applying thermal paste helps your CPU stay cool at all times, and applying it is not an optional step.
There are different ways to apply the paste on a CPU, and you'll often get some conflicting advice depending on who you ask. Those who are new to the world of PC building may find it a bit overwhelming, but the process of applying thermal paste to a CPU is actually quite simple. Here's a simple and reliable guide detailing how to apply thermal paste to a CPU to help you get started.

Best thermal paste in 2024
Keeping your CPU cool is essential if you want a working PC. If you want some of the best thermal paste around, here are your options.Before you apply thermal paste
Things to keep in mind
Before we begin, it's important to ensure the surface of both the CPU cooler and CPU IHS are clean. Your components will already be squeaky clean if you're building a new PC, but they might need some work if you're replacing the paste or installing a new cooler. In that case, you'll have to carefully clean the thermal paste from those components using a microfiber cloth, cotton swabs, or a paper towel with some isopropyl alcohol.

Once your components are cleaned and ready to go, prep them for installation and secure them in place before applying the thermal compound. Thermal paste application is essentially the last step in your cooler installation process that comes before mounting your heatsink or waterblock. If you apply the paste, place your cooler, and then realize you forgot the backplate, your only option is to wipe it down and start again as you may not uniformly spread on the IHS.
How to apply thermal paste
Pay attention to a few important things

There are a few different ways to apply the paste on the IHS of the CPU, as I mentioned previously, and you're likely to come across various methods of doing it in different articles and forum posts. There's no one right way of applying thermal paste to a CPU, and it largely depends on a few things like the size of the CPU die, the quality of paste being applied, etc. The important step in the process is ensuring you get full coverage and the paste is spread evenly on the surface.
You've done a good job if :
- There's enough paste covering the CPU IHS.
- The paste is not spilling out.
- You've created a thin and even layer of paste instead of smearing a thick layer that could potentially reduce the overall thermal efficiency due to the metal surfaces being too far apart.
Which application method to use
How much paste to use?
You may have seen people using what's popularly known as the 'Dot Method' to apply thermal paste. It's a simple method that involves squeezing a small amount of paste — the size of, say, a grain of rice — onto the center of the CPU. Some prefer making a dot the size of a transistor on the board. While this method will do the trick for most consumer-grade CPUs, we're going to try something different in this guide.
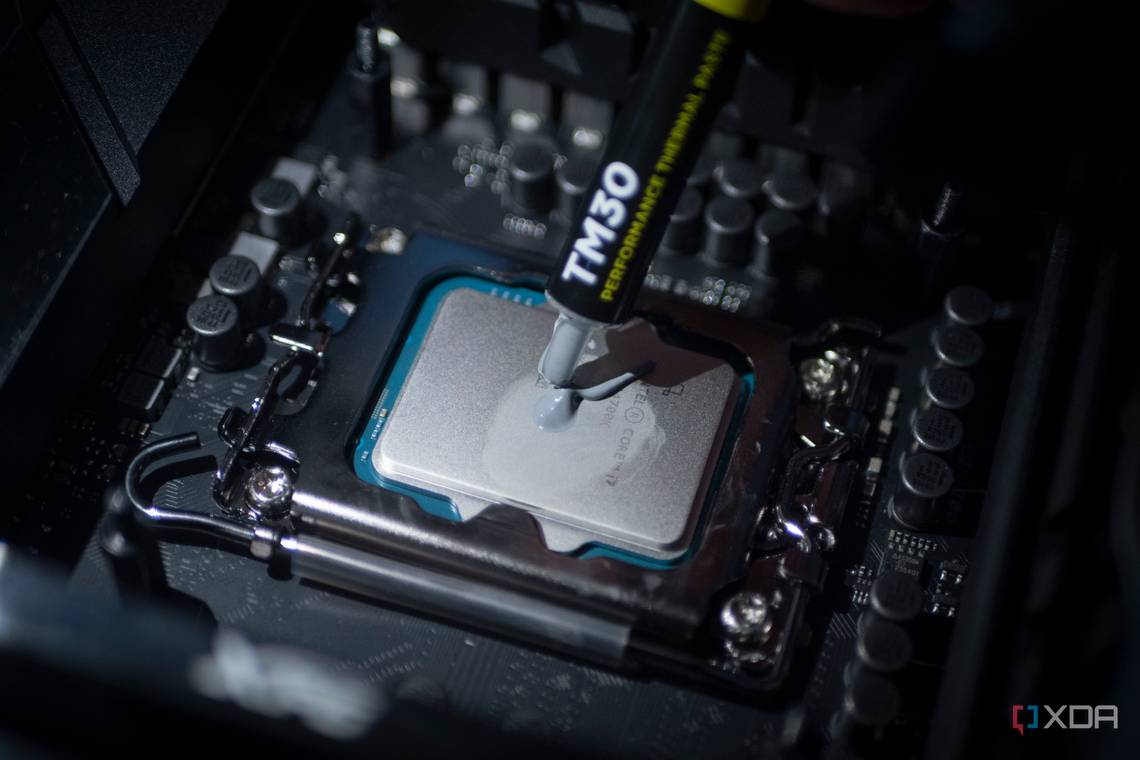
Make a simple line

This method is fairly self-explanatory, isn't it? Apply a line of paste directly onto the center of the IHS and let the cooler pressure do the work as you secure it in place. Any good quality thermal paste with the right consistency will settle evenly on the CPU. You can also make a '%' pattern by applying a line directly down the center and making two small dots on either side. I personally follow the simple line method while applying thermal paste, and it works very well.

You may have some trouble getting an even coat of paste on modern AMD Ryzen 7000 series that are shaped quite differently, with some bits sticking out of the IHS as you can see in the image above. You don't necessarily have to cover those extra bits, but you can use a spatula to manually spread the paste if you wish.
Less is more
Less is more when it comes to applying thermal paste. There's no need to dump an absurd amount of paste on the CPU thinking it will magically reduce your CPU temperatures. We're merely trying to fill the surface imperfections on the IHS and the cooler with the paste, remember? If you are doing this for the first time, then now would be a good time to remove the cooler again to see if your method provides an even spread.
Feel free to experiment as long as you keep the amount of thermal paste in check. Everyone has their own way of applying the paste to get the desired results. You can also go with more small dots towards the center if you think what you have already applied isn't spreading evenly after placing the cooler.
Run stability checks
A crucial step to ensure you've done a good job
Congratulations! If you made it this far into the guide and followed each and every step, then you have now successfully applied thermal paste to the CPU. But did it do the trick? If you were simply replacing either the paste, CPU, or the cooler, then you can directly boot into Windows and run some benchmarks to see how hot your CPU gets. I recommend using monitoring software to get temperature readings over a period of time.
If you're building a new PC, then you can finish putting the rest of the components together and boot into the BIOS to see the CPU temperature before installing Windows. I highlighted this as one of the first things I do right after building a PC, and it's a way good of ensuring you've seated the components properly with the right amount of paste. If the temperature isn't alarmingly high for simply sitting on the BIOS menu, then you're good to proceed further.

I recommend running some CPU benchmarks such as 'Cinebench' to see how the CPU handles the load. Benchmarking and performing stress tests like this usually forces your CPU to hit the maximum frequency with high temperatures. As long as the system isn't crashing just a few seconds into the test, you should be fine. Alternatively, you can also let the CPU sit idle and check the idle temperature to see if it's looking good.
How often should you replace thermal paste?
Thermal paste is not going to wear out as early as you think. However, replacing thermal paste isn't going to harm your system, and I recommend visiting it every year just for good measure. But as a rule of thumb, you should always replace the thermal paste after removing the cooler for any reason. Laptops don't demand this much attention when it comes to replacing the thermal paste. Just make sure you're buying a good laptop from a reliable OEM and the quality will speak for itself.
Applying thermal paste is fairly simple
Now that you have successfully applied the thermal paste to your CPU, there are a few things I want to highlight. The process for applying the paste on the GPU is also the same. In fact, you can use the same thermal paste for your GPU as well, although you'll also need some thermals pads and such to cover some other components. The frequency of replacing the thermal paste for the GPU is also more or less the same. The process for that, however, can be tedious depending on the make of the graphics card and the complexity of installing the heatsink.
Thermal paste should have the same priority as other components on your shopping list for building a new PC. It deserves the same treatment as some other major PC part or peripheral for your setup like, say, the best monitors or even the best mechanical keyboards. Most people, however, treat thermal paste as an afterthought and pick up whatever meets the eye. Let's change that and give more importance to it too. I am leaving links to buy some of our favorite picks here at XDA.

Noctua NT-H1
The Noctua NT-H1 is a highly reliable thermal paste solution you can find right now. It works well even for extreme overclocking conditions.

Arctic MX-6
The Arctic MX-6 is the direct successor to the popular MX-5 thermal paste solution. It's promised to deliver an uplift of 20% in thermal performance with increased viscosity. If you want the best overall thermal solution for your CPU, this is it.