
Sometimes, PCs can have problems that are hard to pin down, but Windows 11 has a feature called Safe Mode that can help with this. Safe mode helps you narrow down problems by booting Windows with only a limited set of drivers, and if a problem doesn't happen in Safe Mode, you'll know it's not caused by the core drivers or Windows itself.
There are three different types of Safe Mode in Windows 11, which can be helpful in specific situations. Standard Safe Mode loads the regular Windows UI with a limited set of drivers and no internet access. If you want to use the internet, you can use Safe Mode with Networking. And if you want to bypass the standard Windows UI, there's Safe Mode with Command Prompt.
How to boot into Safe Mode from Windows 11 Settings
In Windows 11, it's easy to boot into Safe Mode by going through the Windows Recovery Environment. This method, on the other hand, works for every Windows 11 PC.
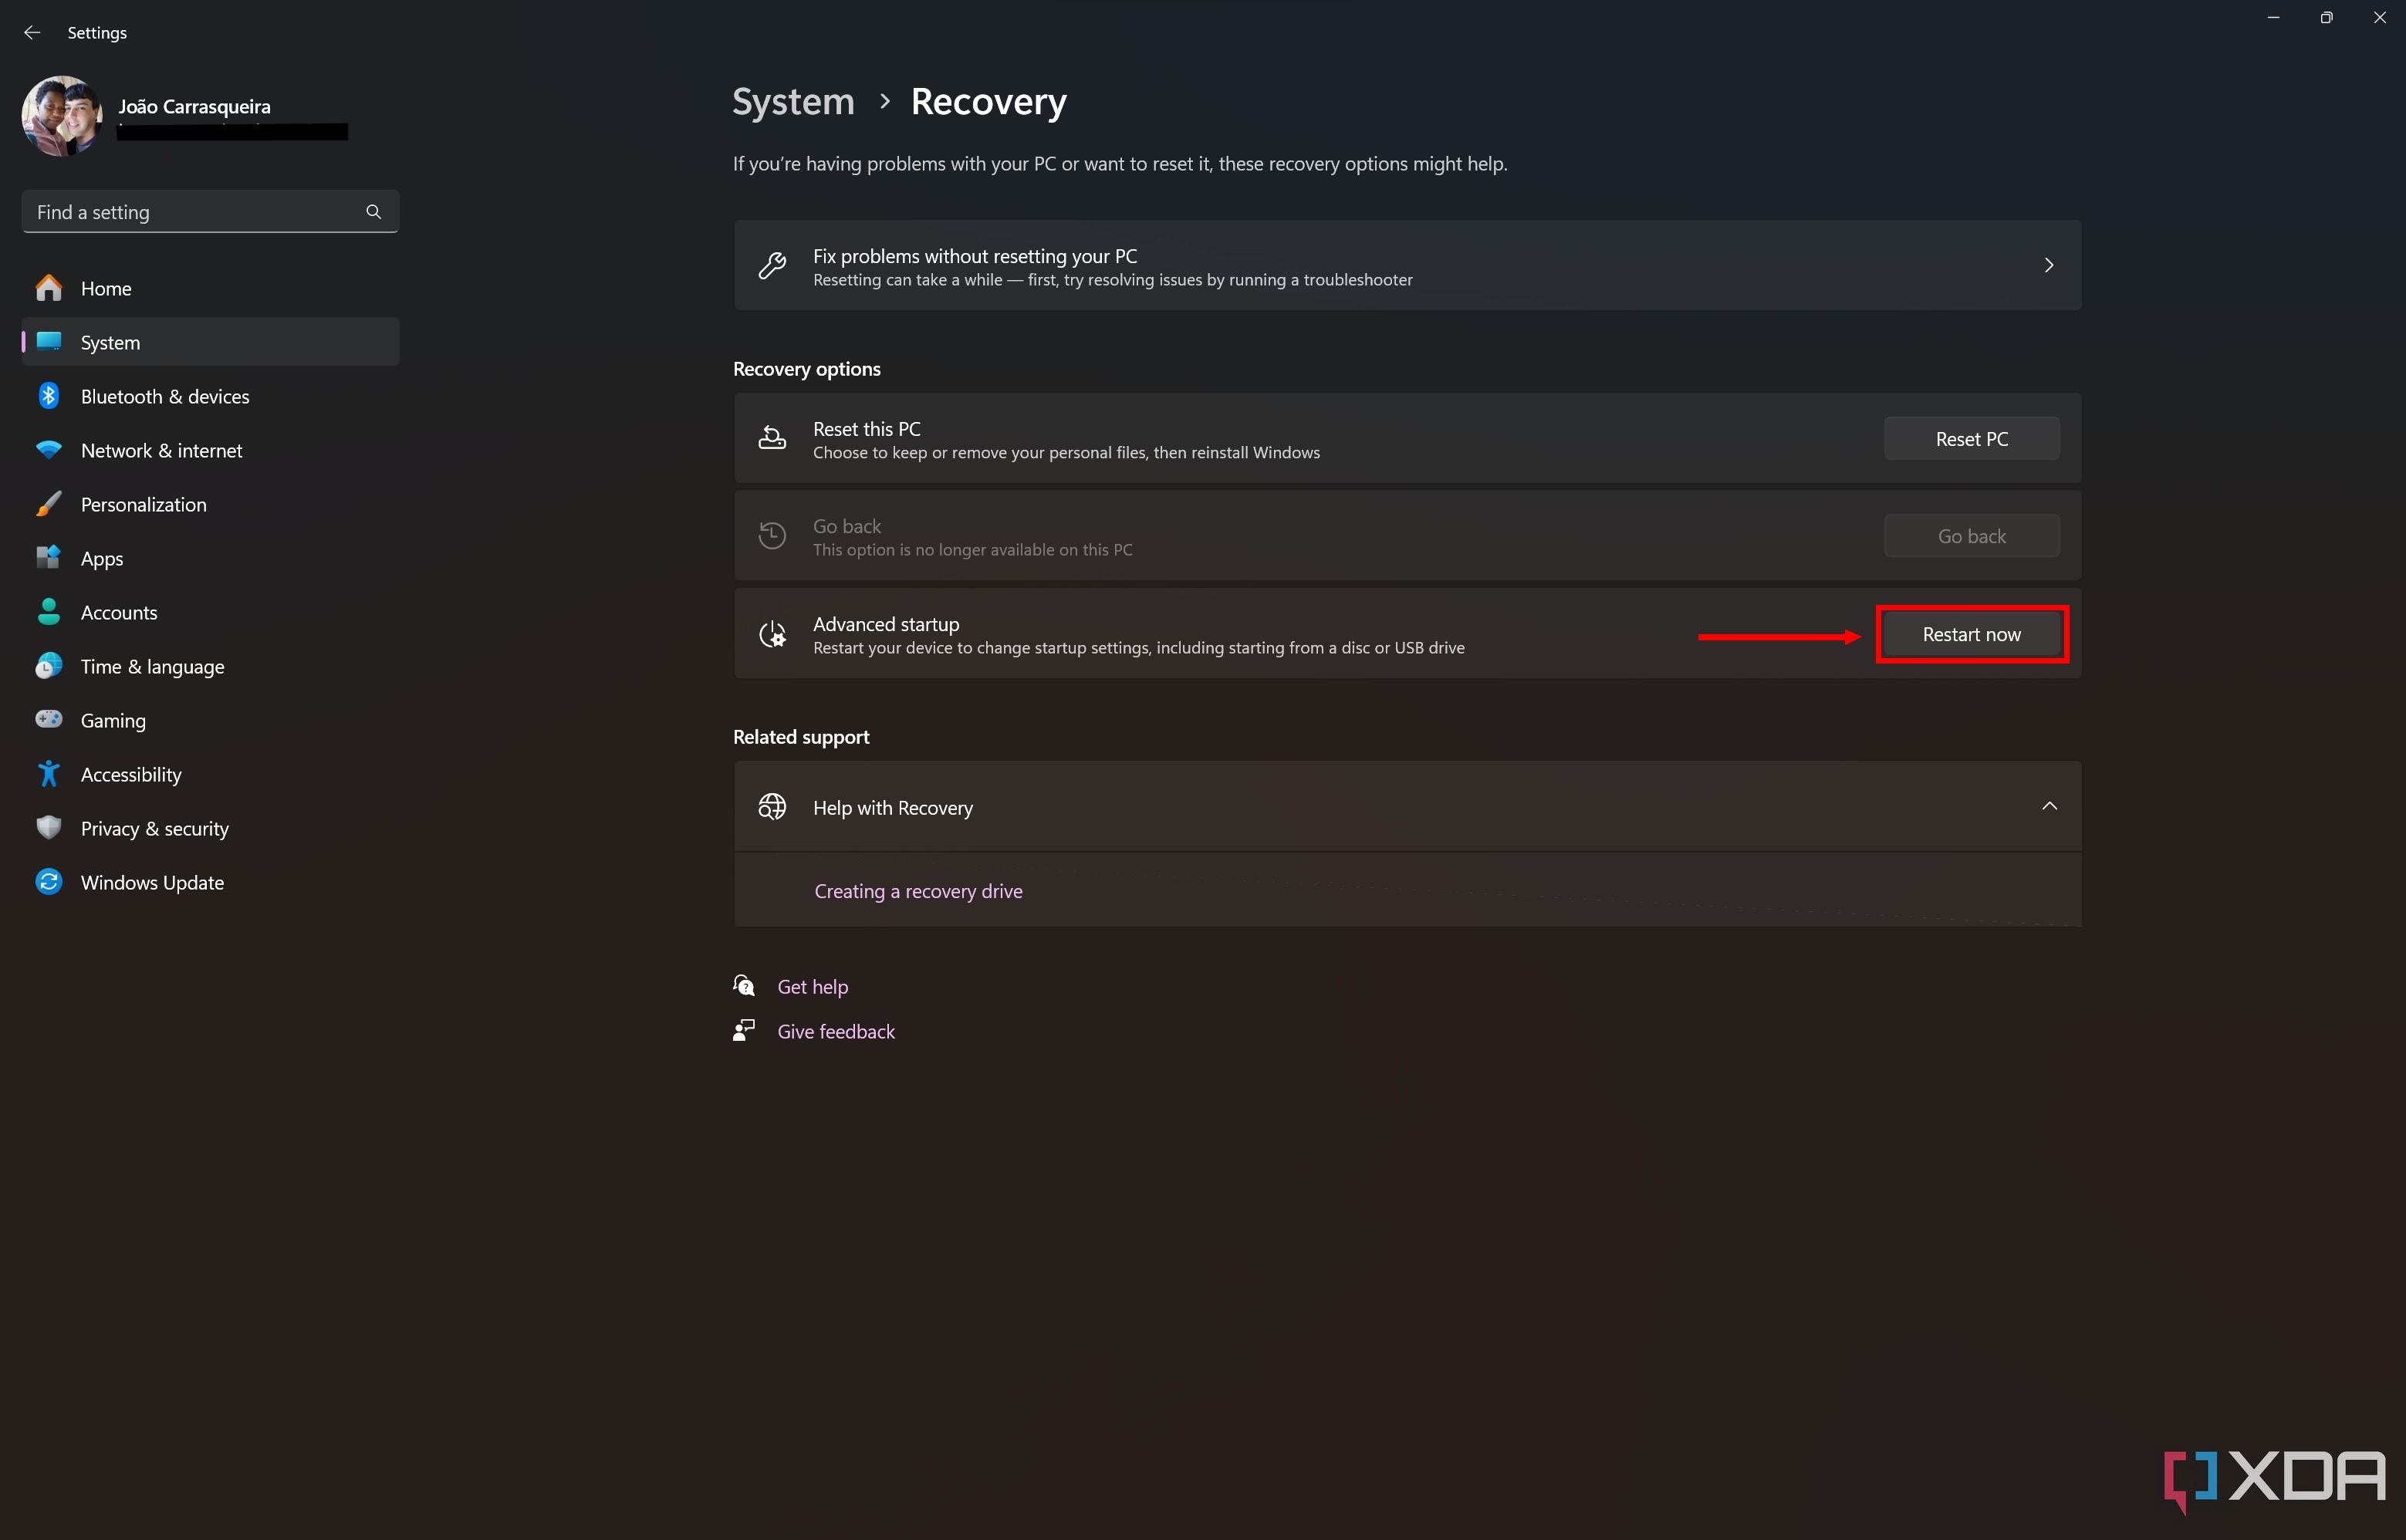
- Open the Settings app and click Recovery on the main page.
-
Next to Advanced startup, click Restart now. You'll be taken to the Windows UEFI environment.
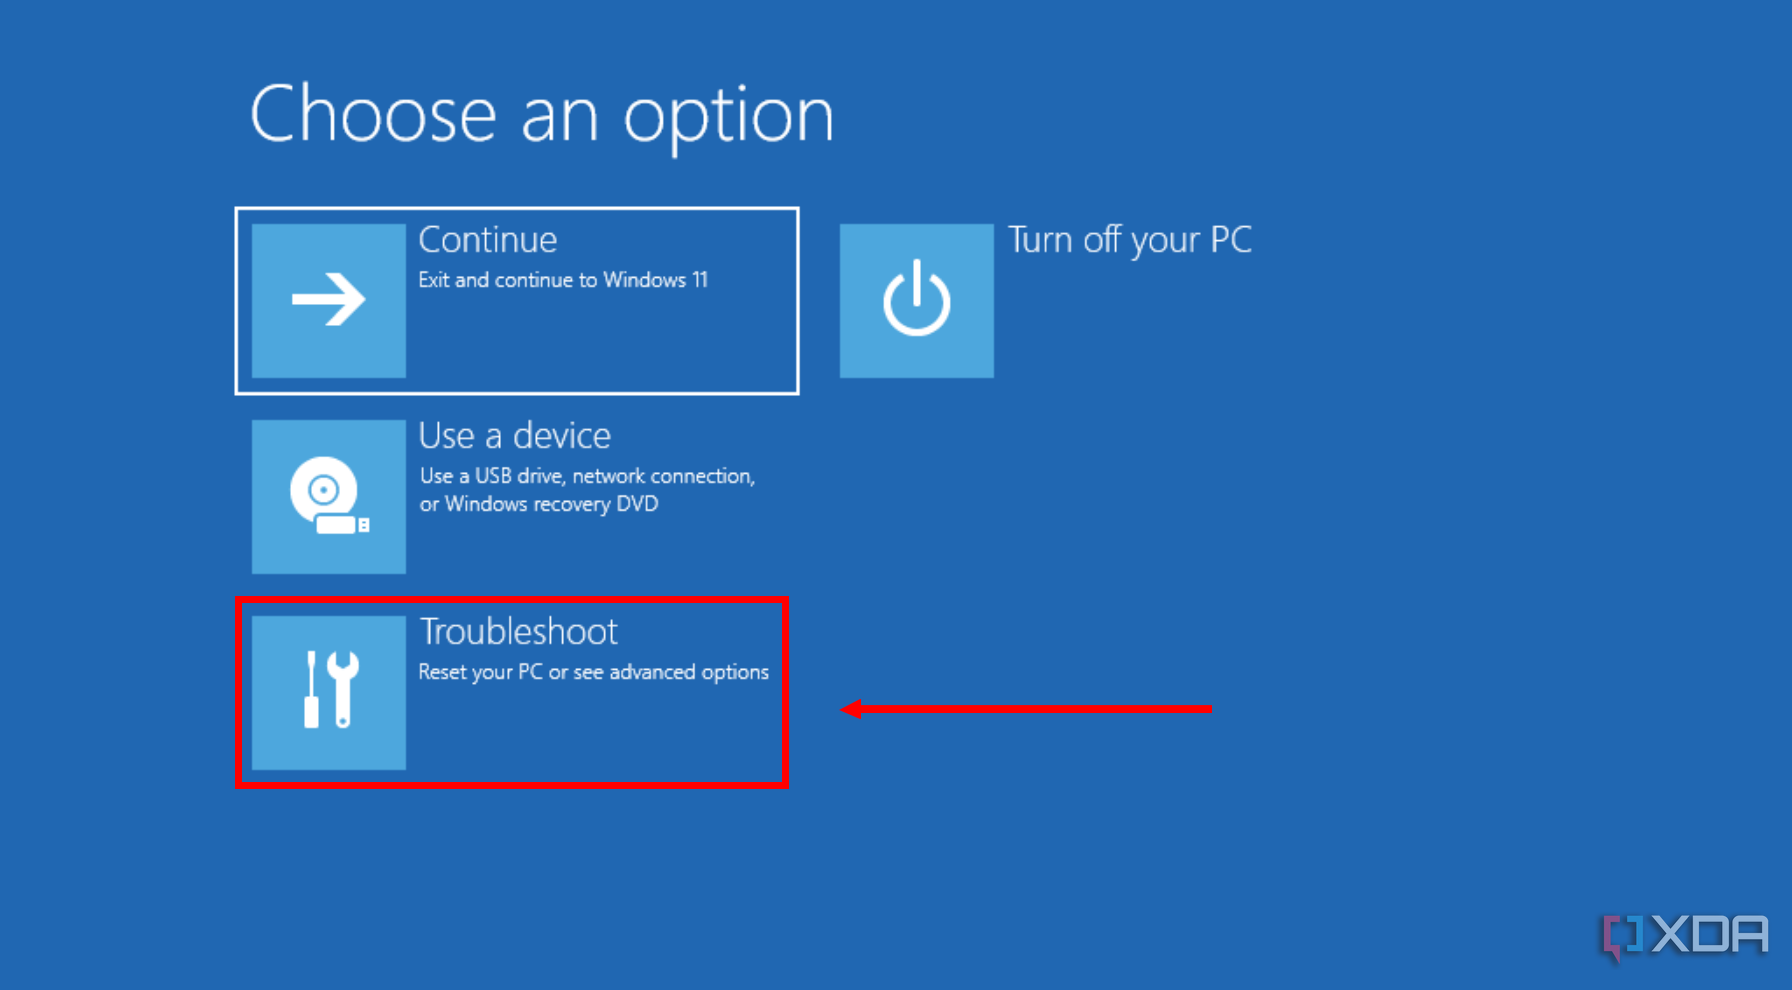
- Click Troubleshoot.
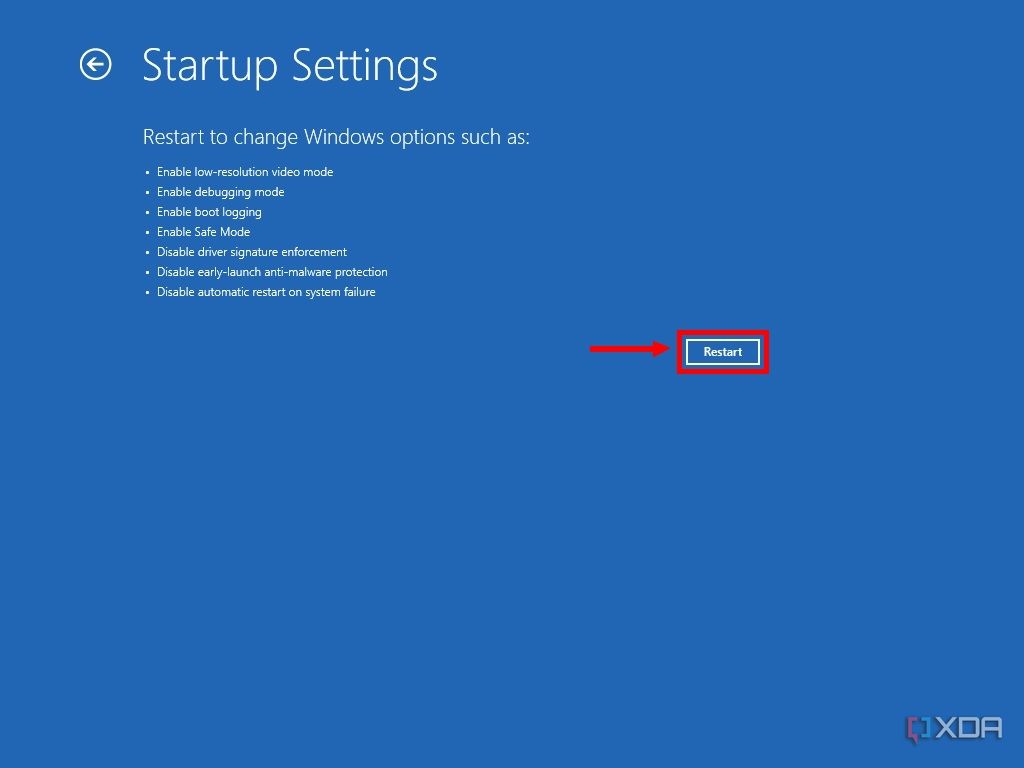
- Choose Advanced options.
-
Click Startup Settings, and restart.
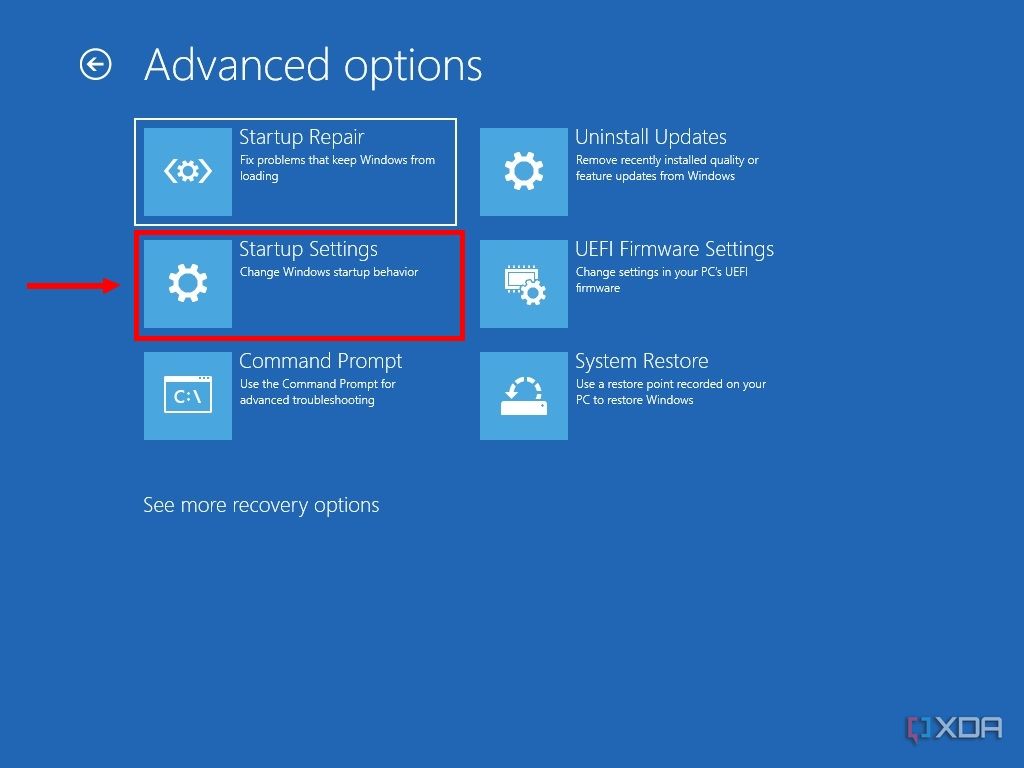
- At this point, if device encryption is enabled for your PC, you'll have to enter the BitLocker recovery key to proceed (see below).
-
You'll have a few startup options you can choose with your keyboard. Pressing 4 will boot into normal Safe Mode, 5 will give you Safe Mode with networking, and 6 launches Safe Mode with Command Prompt.

- Your PC will restart as soon as you press one of the keys.


Your PC will now boot into Safe Mode, and you can log in as normal.
How to boot into Safe Mode from the sign-in screen or Start menu
An easier way to boot into Safe Mode is to use the power button on the sign-in screen or in the Windows 11 Start menu. Most of the process is the same:
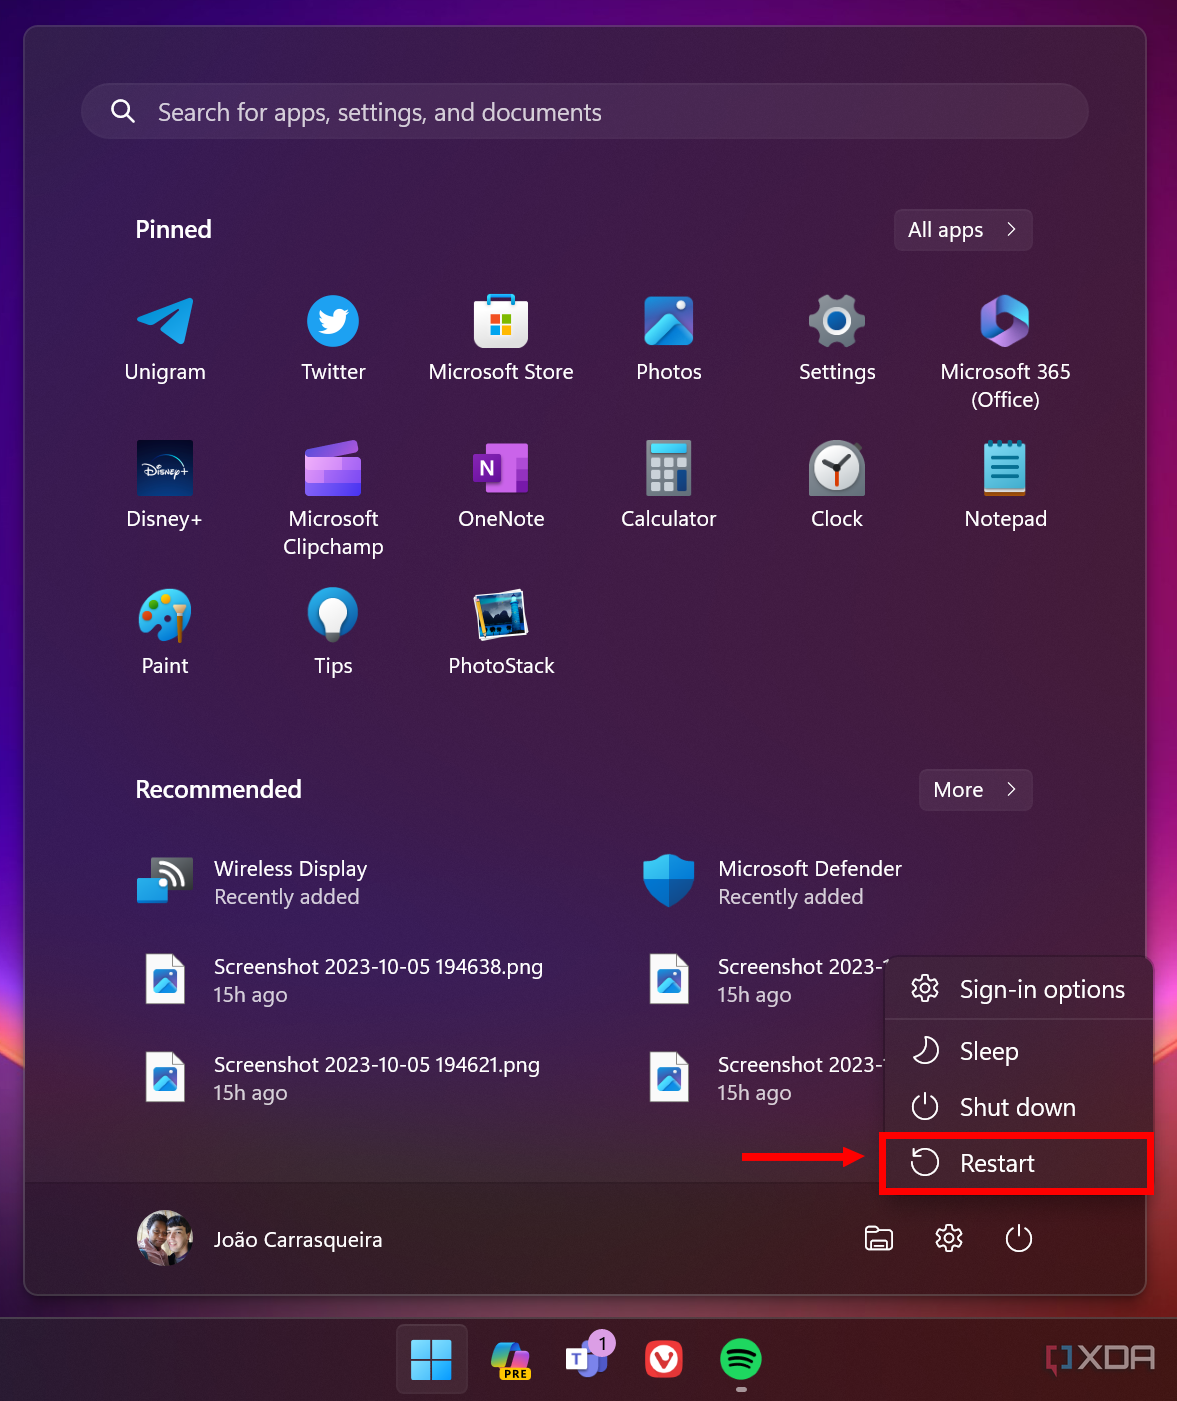
- On the sign-in screen or Start menu, click the Power button.
-
While holding down Shift on your keyboard, click Restart. You should boot into the Windows Recovery Environment.
- Click Troubleshoot, then Advanced options.
- Choose Startup Settings and click Restart.
- Enter your BitLocker encryption key, if needed (see below).
- Press 4, 5, or 6 on your keyboard to select your desired Safe Mode.

How to boot into Safe Mode from a black screen
Both methods above only work if you can access and use Windows already. If you're facing a black or blank screen, however, you need an alternative, which requires putting your PC into Automatic Repair. Here's how to do it:
- Turn off your PC by holding down the power button for 10 seconds.
- Press the power button to turn the PC on.
- Once you see a manufacturer's logo or any sign of activity from your PC, press the power button for 10 seconds to force your PC to shut down.
- Repeat steps 2 and 3 again.
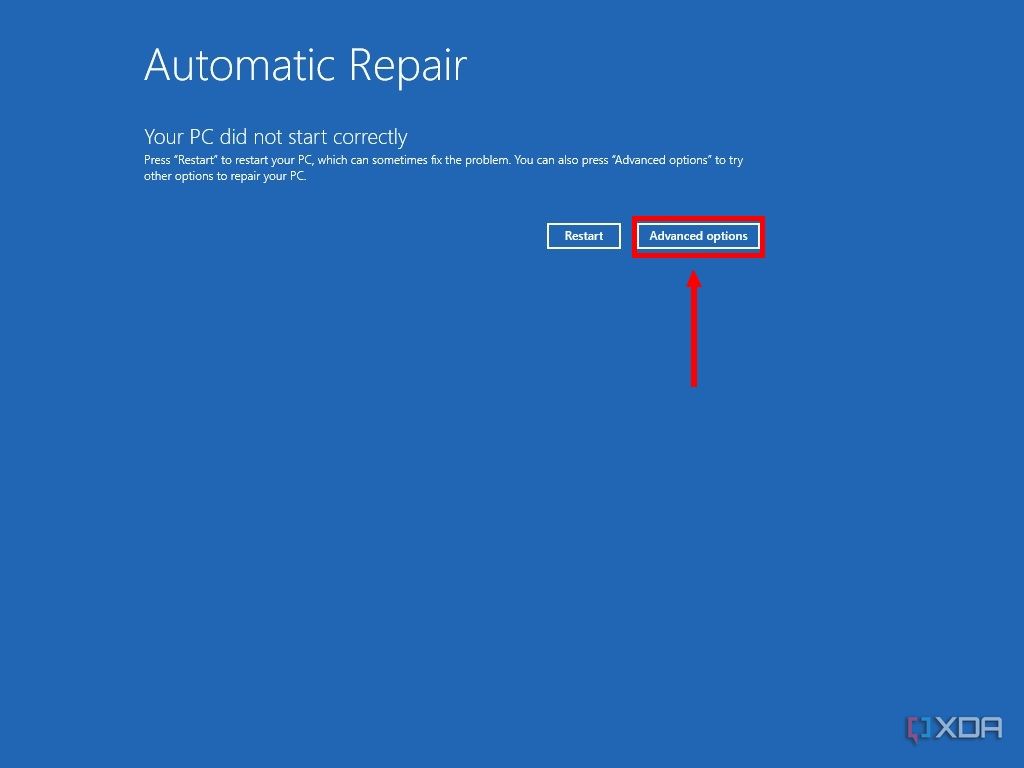
- Press the power button one more time to turn on the laptop. It should now boot into Automatic Repair.
-
Click Advanced options to go into the Windows Recovery Environment.
- Click Troubleshoot, then Advanced options.
- Choose Startup Settings and click Restart.
- Enter your BitLocker encryption key, if needed (read below).
- Press 4, 5, or 6 on your keyboard to boot into the corresponding version of Safe Mode.

How to make Safe Mode the default
If you want to always boot into Safe Mode until you actively disable it, you can follow these steps:
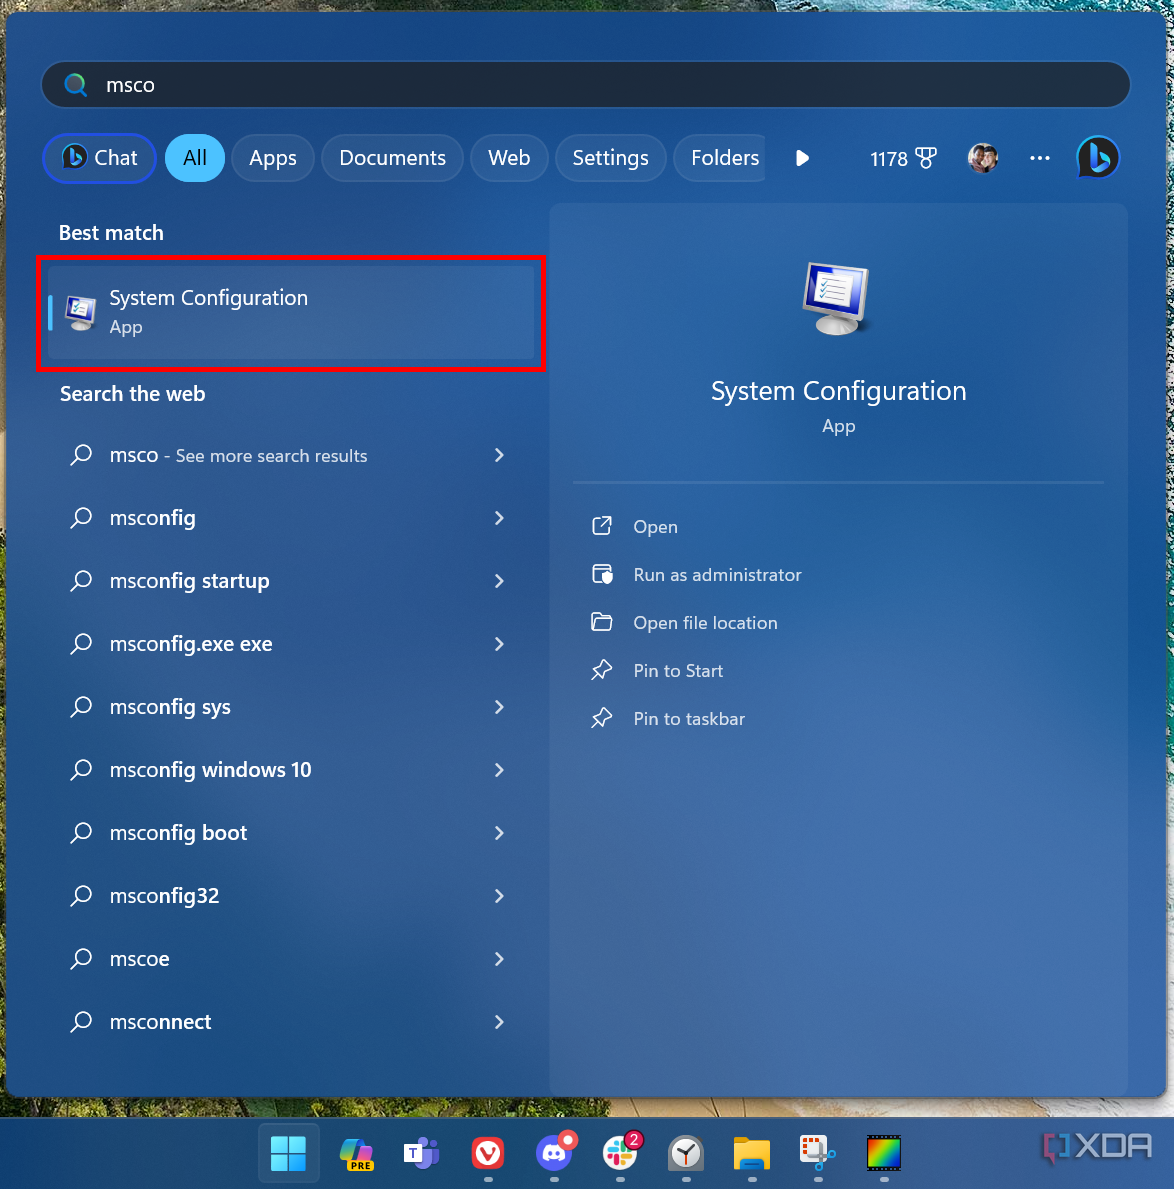
-
Press the Windows key and type msconfig. Press Enter to open the System Configuration tool.
-
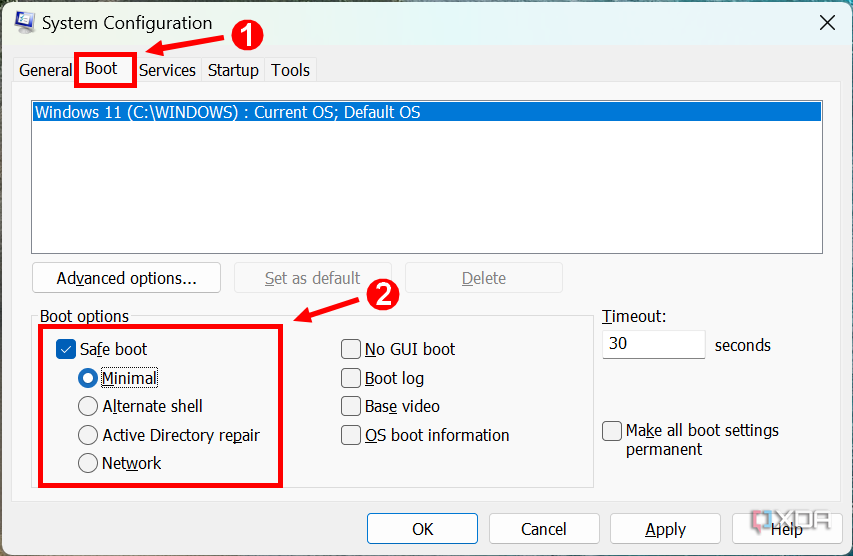
Switch to the Boot tab, and enable Safe boot.
-
The options below let you choose between different Safe Mode variants:
- Minimal: standard Safe Mode,
- Alternate Shell: Safe Mode with Command Prompt
- Network: Safe Mode with networking
- Click OK and restart the PC. You'll now boot into Safe Mode after every restart. You can run the System Configuration tool again to go back to the normal Windows mode by disabling Safe Mode.


What to do if you need BitLocker recovery keys.
If you're using drive encryption on your device, you'll need the BitLocker recovery key to boot into Safe Mode. If you signed in using a Microsoft Account, the BitLocker recovery key can be found on this Microsoft Account webpage.
If you're not signed in with your Microsoft account, you may have stored the recovery key on a USB flash drive or printed it out. If your PC belongs to an organization, you may need to contact an administrator for the recovery key.
That's all you need to know about booting Windows 11 into Safe Mode. As we've mentioned, this can be an important tool to troubleshoot issues with your PC, but it's not something you want to be doing all the time. Still, it's always useful to know for when you do need it.