If you recently switched from a Mac or PC to ChromeOS, you've probably noticed the setup is a bit different. It's natural to want a few tips and tricks when migrating to a new operating system and UI. The good news is that ChromeOS is incredibly user-friendly and very powerful. Whether you're a developer or a casual user, the customization available is truly impressive.
Some of the basics like taking a screenshot or setting up notifications are also a bit different on your Chromebook. In this article, we'll take a look at how to set up the settings on your Chromebook, Chromebox, or tablet running ChromeOS from start to finish.
First, we'll take a look at the basic menus presented when booting your Chromebook for the first time. In this section, we'll also explore basic settings to change or double-check after walking through the initial boot menu. Next, we'll discuss a few tips, tricks, and settings that are useful for everyone new to ChromeOS. The third section of this article focuses on tips and tricks specific to users migrating from PC to Chromebook. You might consider skipping this section if you're switching from a Mac, though. Finally, we'll discuss tips and tricks useful for former Mac users.
Basic ChromeOS setup

Before we get started, make sure your Chromebook has a full battery. If you don't have much charge on your Chromebook at the moment, it's probably worth connecting to a power outlet. The steps below detail the full initial boot menu, and include some additional tips for after you exit the walkthrough.
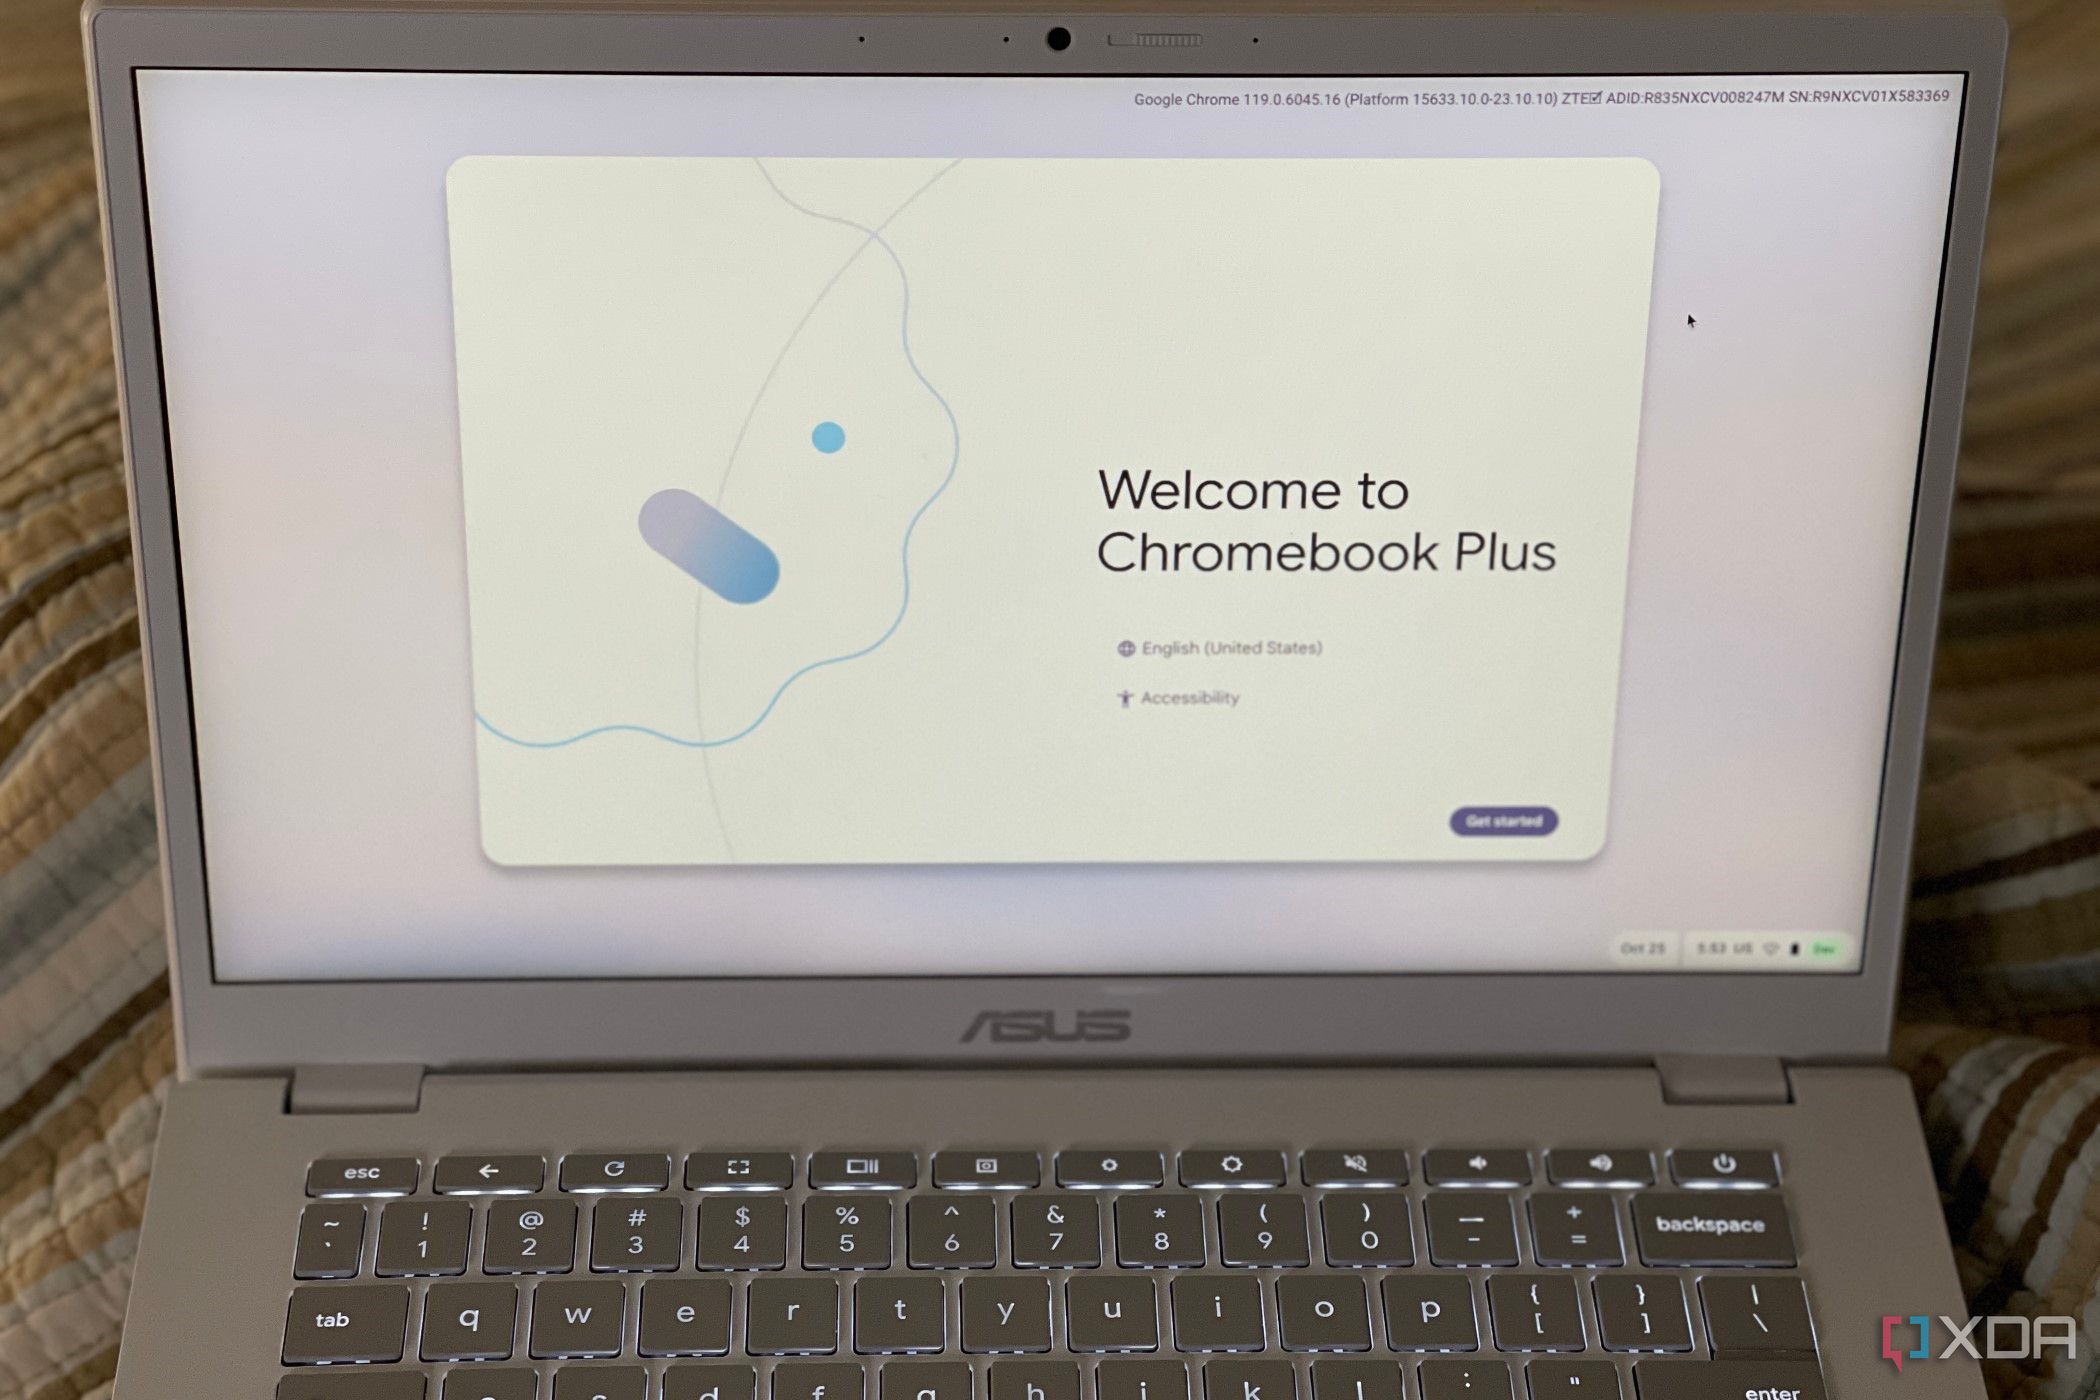
- Power on your Chromebook.
-
Click Get Started.
- Connect to a Wi-Fi network.
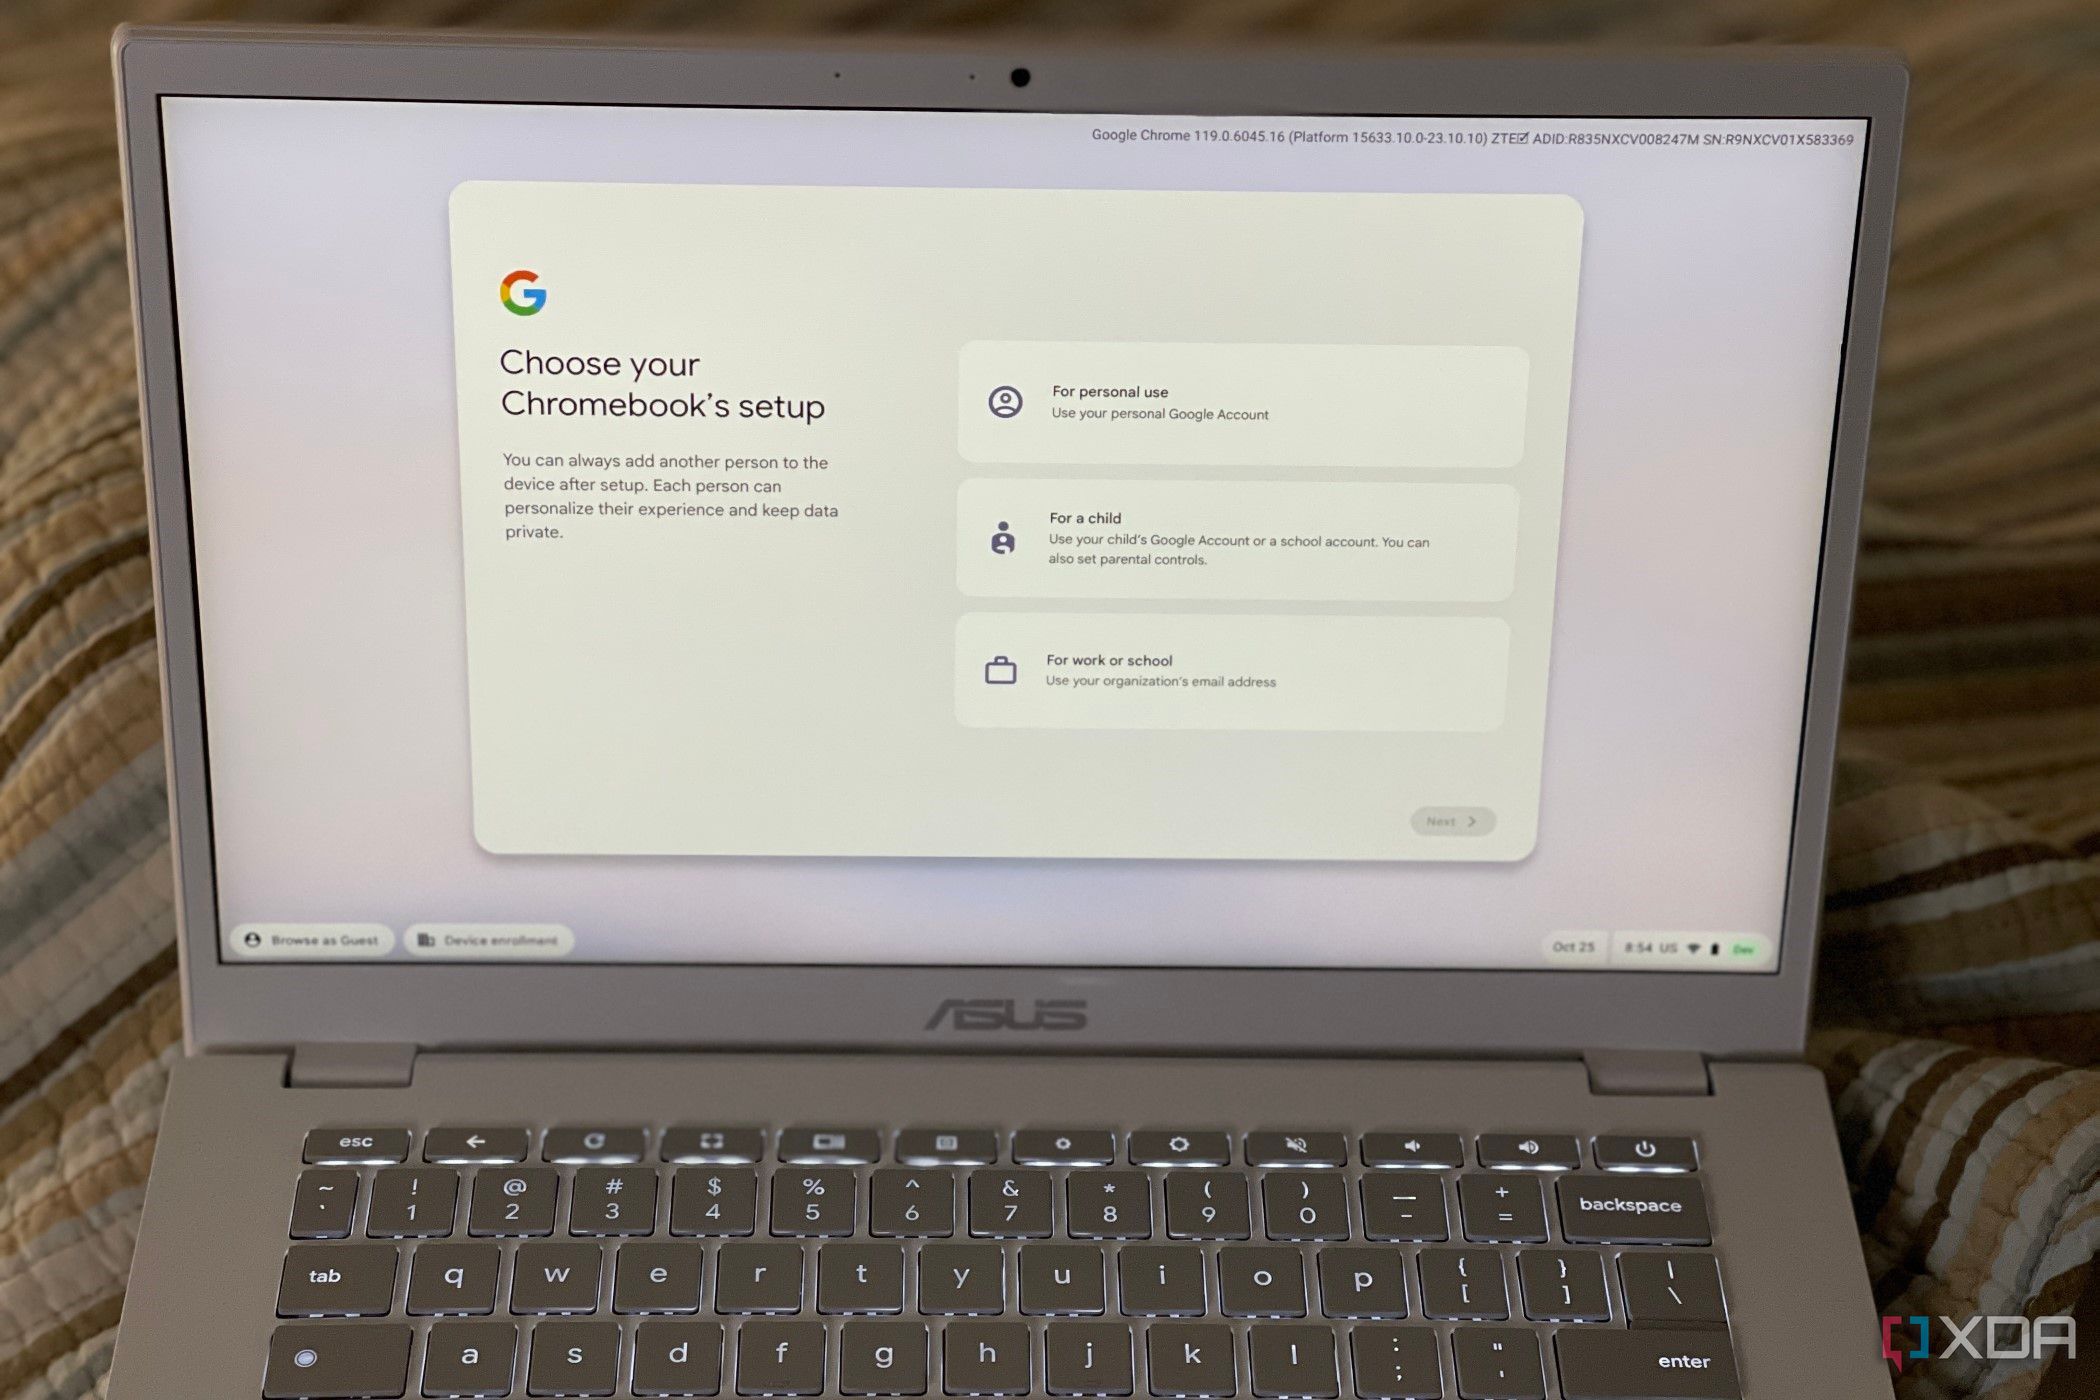
-
Choose how you'll use your Chromebook, either For Personal Use, For a child, or For work or school.
- Sign in with your Google Account on your Chromebook.
- If prompted, complete the two-factor authentication.
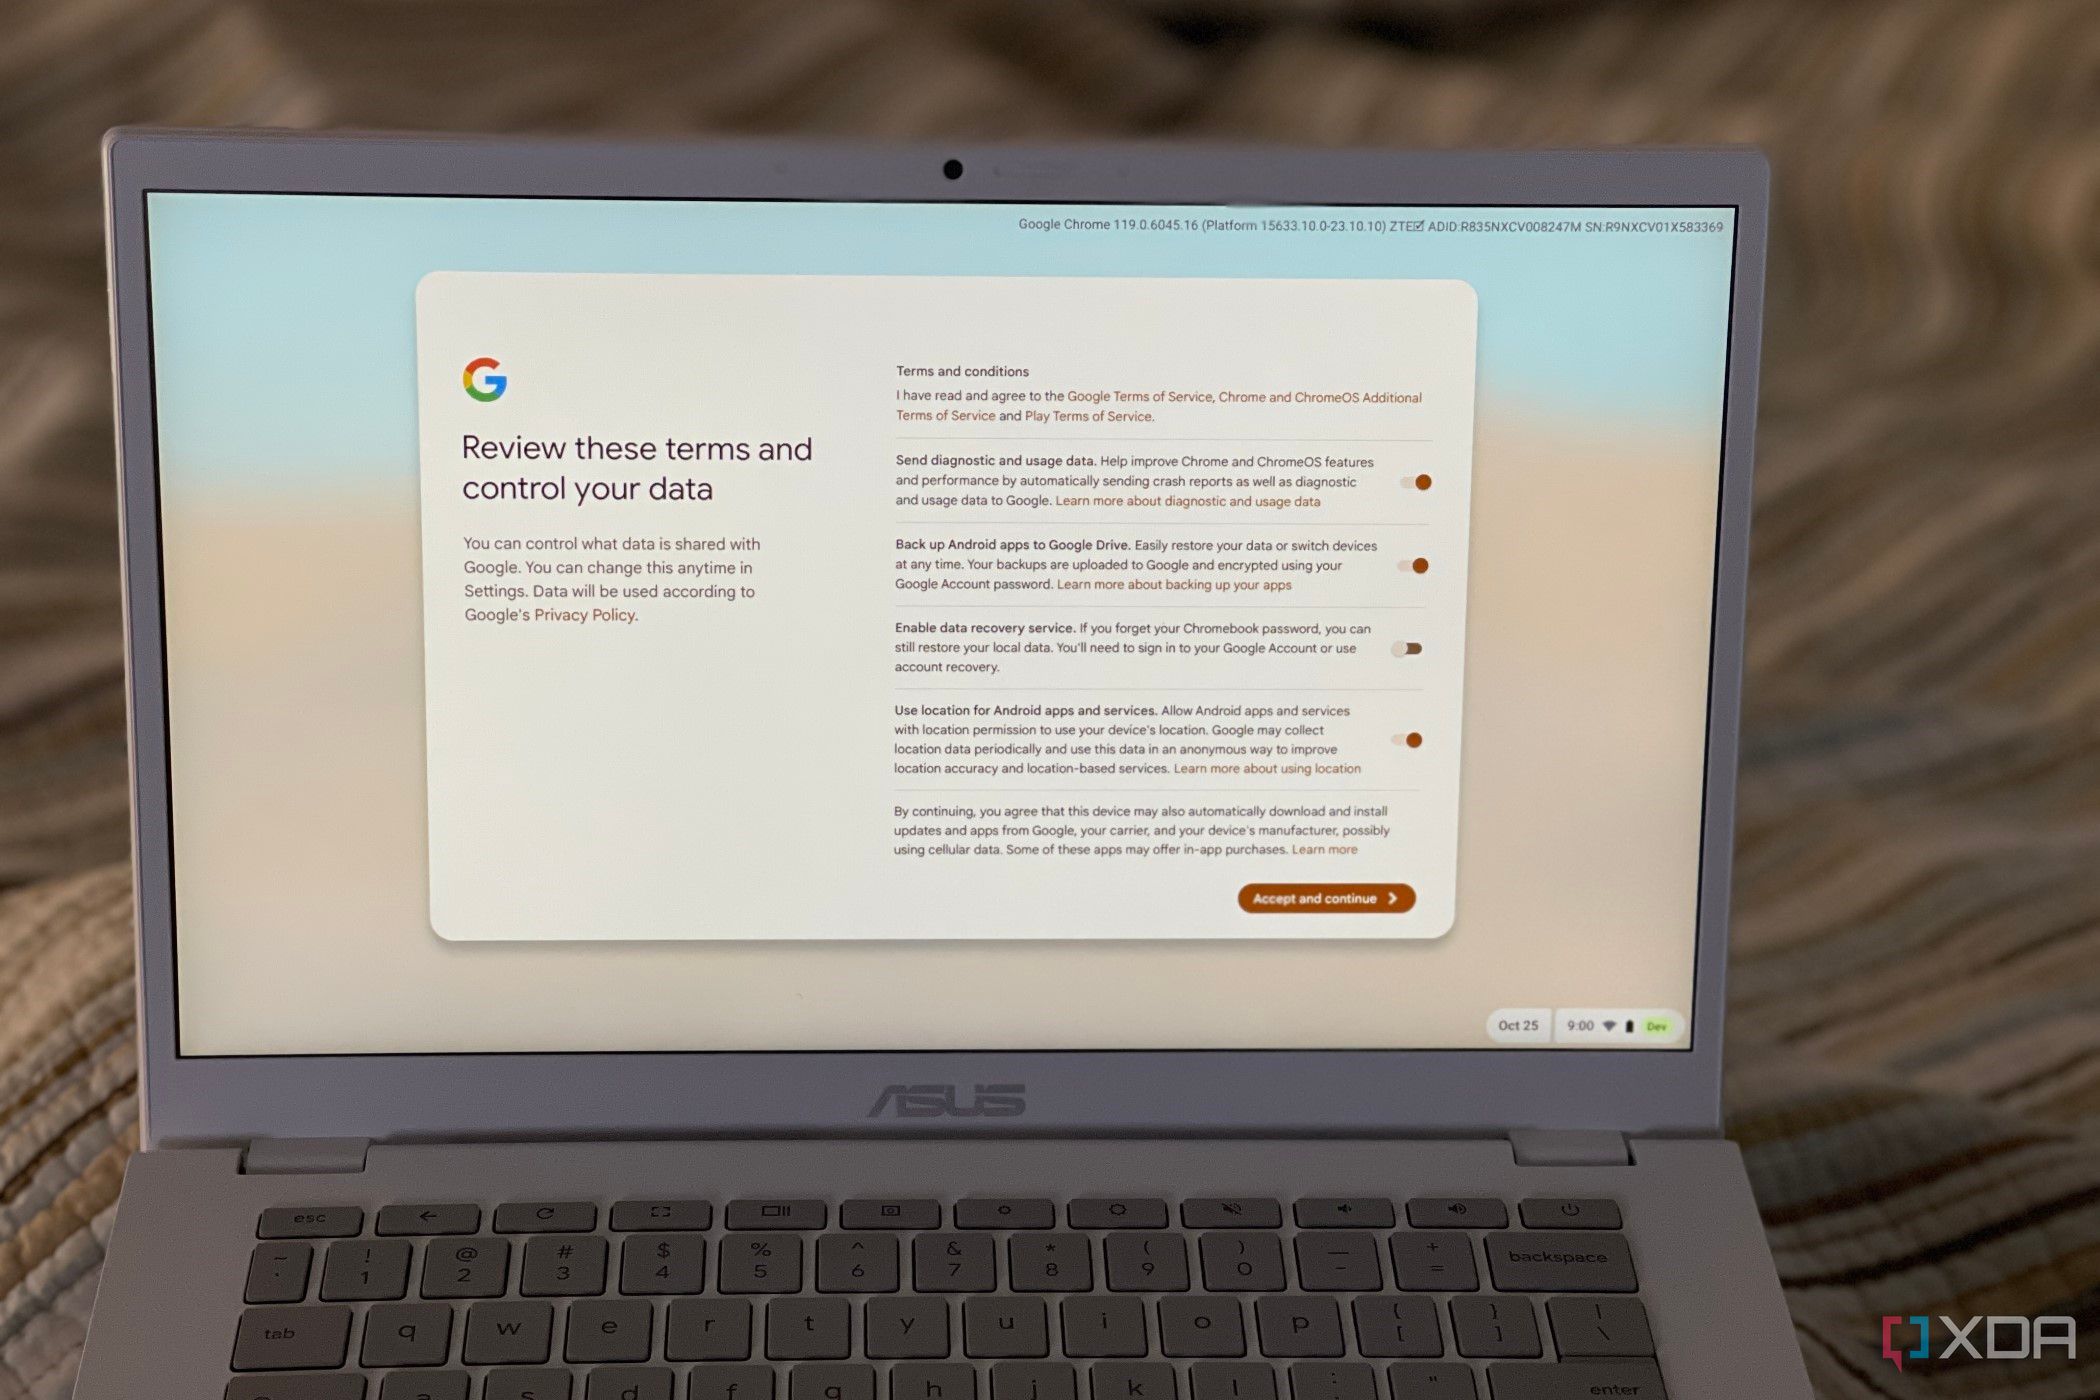
- Review the terms and conditions. Choose if you want to send diagnostic data, back up Android apps to Google Drive, enable data recovery, and use location services.
-
Press Accept and Continue.
- Review what you want to be synced on your Chromebook. You can choose the Review sync options following setup to do this later.
-
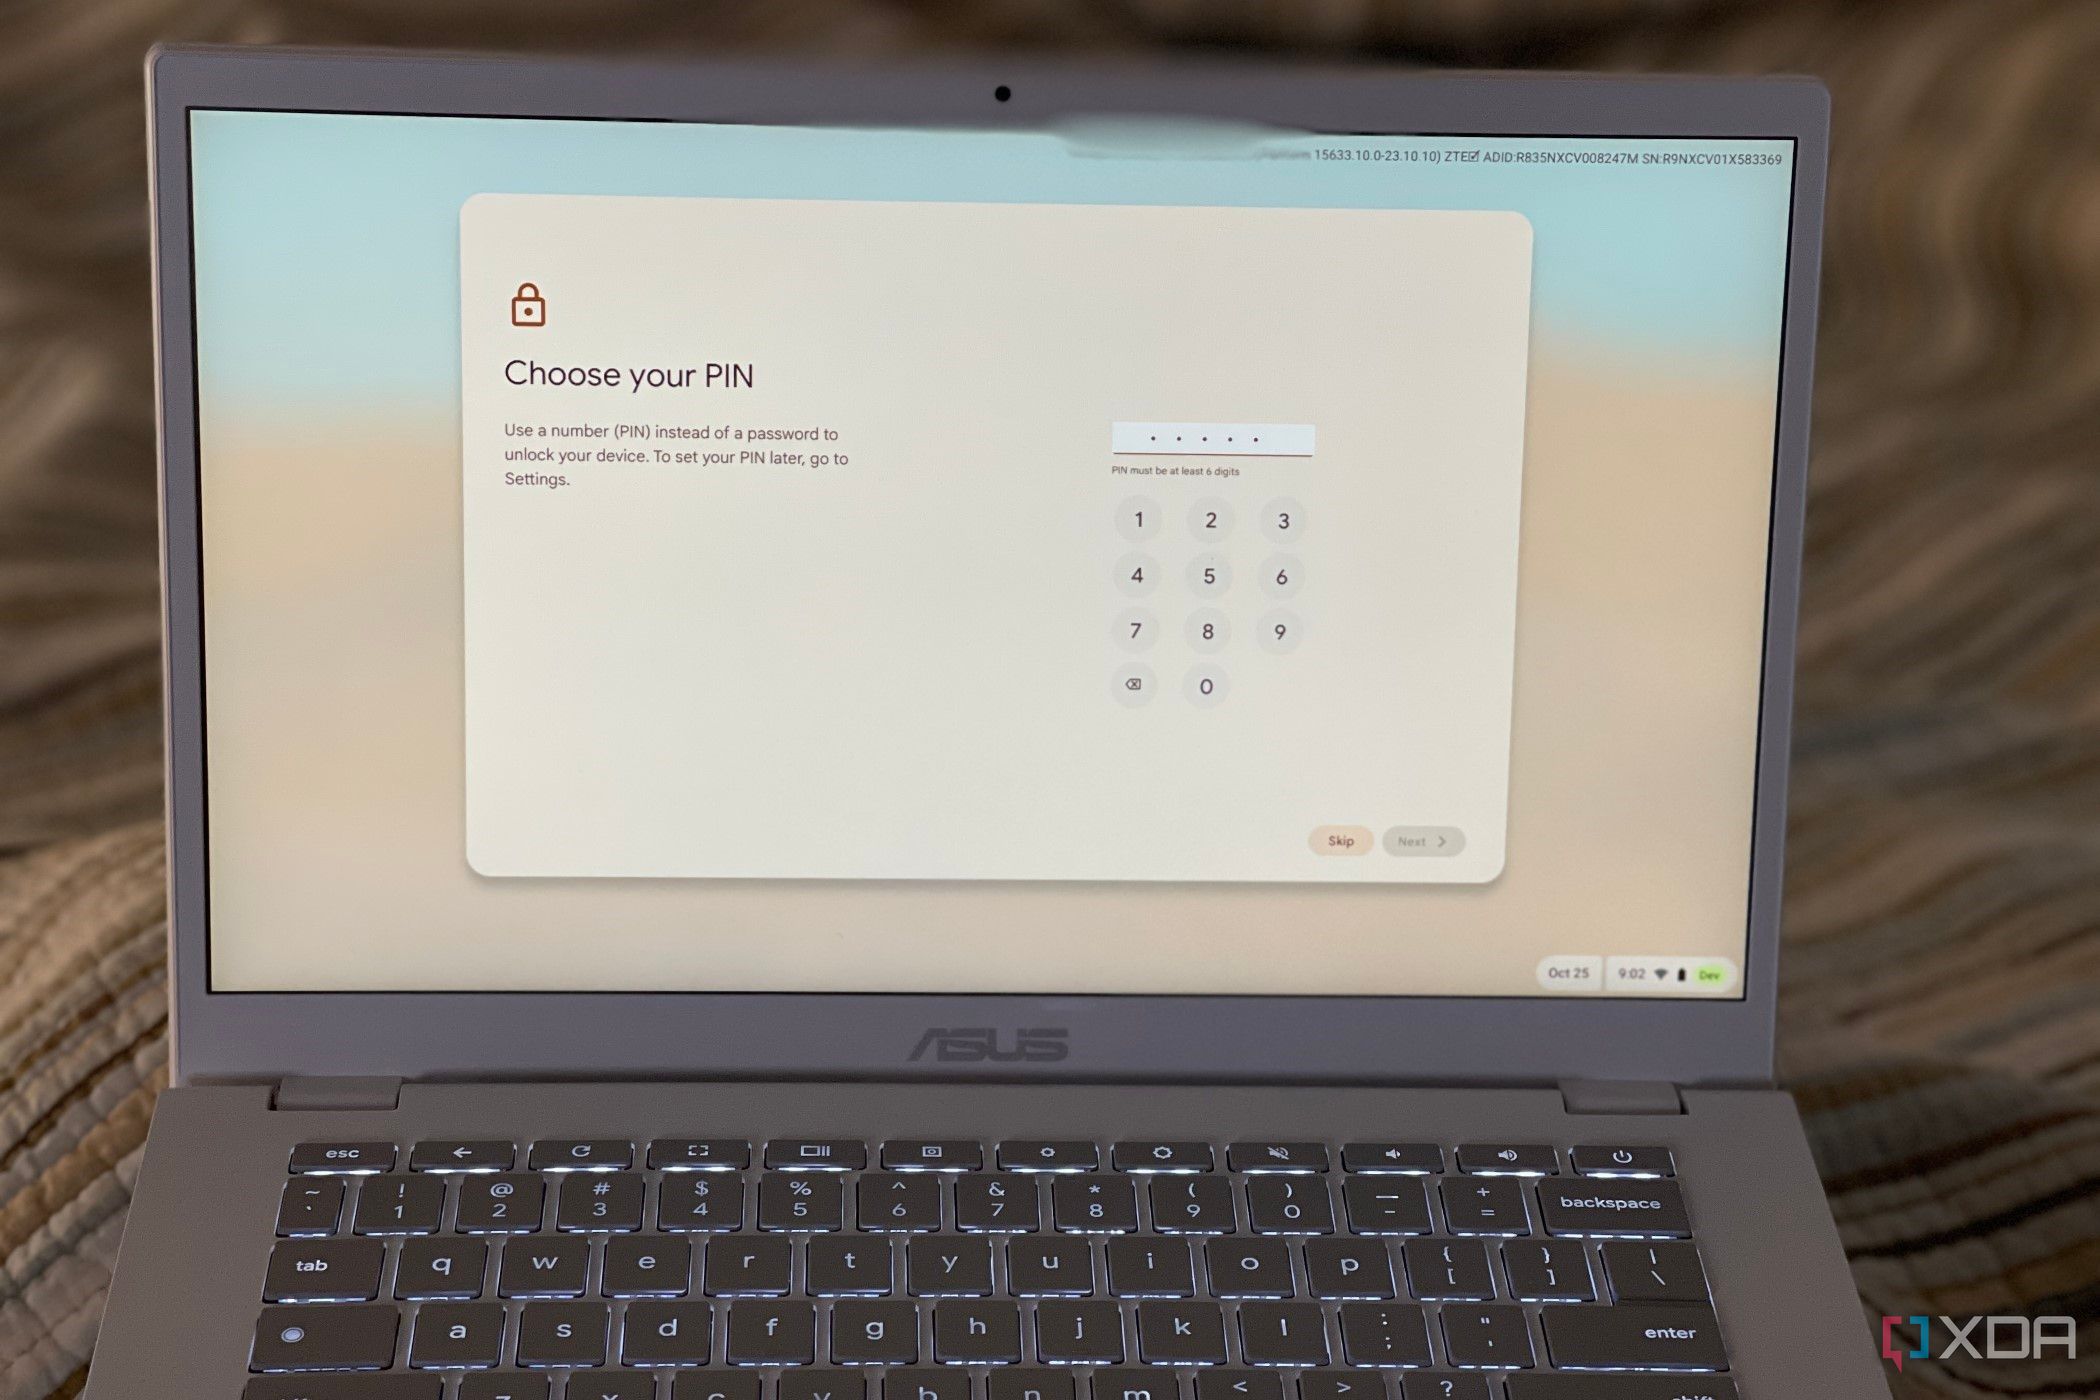
Choose a PIN, or scan your fingerprint if your device supports it.
- If you'd like, you can choose to change your touchpad settings, change the display size, or select light and dark theme. Play with the settings here and click Next. Or, choose Skip.


That concludes the initial setup. Stock apps should update and install automatically. However, you can also launch the Google Play Store by clicking the ChromeOS launcher to the left of your screen and searching for it. Once you launched it, click on your profile icon at the top right, choose manage apps and device, and check under updates available to update existing apps.
Recommended settings and tips for all new users

There are some fundamental things that any new Chromebook user should be aware of. Basic tasks like taking a screenshot, managing files, or changing scroll direction are important for all users. In this section, we'll also take a look at several options within the Settings menu that you should be familiar with. If you're migrating from a PC or Mac, you may want to also read through the tips for moving to ChromeOS from your previous operating system.
- Taking a screenshot: If you want to take a screenshot of your entire screen on a Chromebook, press Ctrl + Show windows button (Ctrl + F5 on a Windows keyboard). To capture a partial screenshot, press Shift + Ctrl + Show Windows (Shift + Ctrl + F5 on a Windows keyboard), then click and drag your cursor over the exact area you want to capture.
- Caps Lock key replacement: You may have noticed that Chromebooks do not have a Caps Lock key. You can capitalize letters using the Shift key as usual, but you can also press Launcher + Alt to enable Caps Lock.
- Change scrolling direction: It's easy to change the scroll direction on your Chromebook. To do this, click the time in the bottom right-hand corner, and click the Settings icon. Scroll down and select Touchpad. Under the scrolling option, select Enable reverse scrolling.
- Finding system specifications: Both Mac and PC users have convenient ways to locate a full list of their system specs. This is also possible on ChromeOS with a little extra work. To access the System Page, open a Chrome browser on your Chromebook and in the browser bar, type chrome://system. Hitting enter will display a long list of all the system specs you're used to on your previous device.
- Locating and managing files: Chromebooks are built for the cloud, and local storage works a bit differently. Your information gets saved within the Files app instead of on your Desktop or Documents folder. You can use the Launcher to access that app quickly and then search for what you need. All downloaded content will appear in the Downloads folder, but you can also add subfolders for easy storage. If you plan to use your Chromebook as your main device, we recommend using a cloud service like Dropbox or Google Drive as your primary storage solution.
- Customize your dock: Organization is important for any workflow. You can pin apps to your dock (at the bottom of your screen) for easy access and use. At the bare minimum, you'll want to keep Chrome, Gmail, Files, and likely YouTube in the dock. If you use your Chromebook for work, you may also want some productivity apps like Docs and Slides. Remember you can also pin Android apps.
- Use virtual desktops: ChromeOS has a feature known as "desks," which is a virtual desktop experience. With Desks, you can open apps and Chrome Windows in different spaces to separate work from school, etc. To trigger it, look for the Show windows key. It's usually the fifth key from the left in the top row. At the top middle of the screen, you'll see a Desk 1 option. This is your main desktop. Create a new desk by clicking the + icon at the top.
- Use the task manager: ChromeOS has a Task Manager that lets you see the device's memory footprint. You can get to it by tapping the Search button and Esc on your keyboard.
- Add new users: To add a new user to your Chromebook, go to the lock screen, and click the Add Person link.
- Change your wallpaper: To change your wallpaper, open the ChromeOS Settings app, choose Personalization, and then Set your wallpaper and Style.
- Check battery health: Check your battery health on a Chromebook by going to the Diagnostics app.
Tips for switching from PC to ChromeOS

There are a few key things you might be looking for when you switch from a PC to a Chromebook. Changing common settings and organizing files are fairly basic tasks. On Windows, you probably know exactly where to go for both of these tasks. ChromeOS is organized a bit differently. In this section, we'll take a look at three of the most substantial changes coming from a PC to ChromeOS.
- Locating applications on PC: On the Chromebook, you can access both Chrome and Android apps via the Launcher. The Launcher is a button located at the bottom of your Chromebook. The Launcher is accessed by either clicking on the button or swiping up from the bottom dock if you have a touchscreen device. From the Launcher menu, you can access all of the popular apps installed earlier, including Google apps like Gmail and YouTube.
- Enabling right-click: Right-click works a little differently on a Chromebook than it does on Windows where you just tap the right side of a trackpad. On Chromebooks, you can either press the touchpad with two fingers to open the right-click menu (as you might on a Mac), or you can click Alt and use just one finger on the touchpad. Once you do, you can scroll, moving left and right to move horizontally, or up and down to move vertically.
- Learn new keyboard tricks: One thing PC users will notice right away is the lack of function keys. Indeed, Chromebooks also don't have a Print Screen key. Luckily, it's incredibly easy to take a screenshot in ChromeOS, as we've seen. On your Chromebook, you'll notice several new shortcut keys at the top of your keyboard that adjust volume, brightness, and control window operation for apps. The good news is Windows shortcuts for copy, cut, and paste still work the same on your Chromebook.
Other accessibility settings worth checking out

While we hit a lot of basic settings that you'll come across in ChromeOS, there are also some additional things you might want to discover. In particular, Chromebooks have a lot of great accessibility settings designed to make your Chromebook easier to use. This includes making content on the screen easier to read, and making using a ChromeOS tablet easier. We've recently dived deeper into five of these features.
- Live captions: To get a readout of what's playing in Google Chrome, you can turn on Live Captions. Just go to the settings app, go to Accessibility, look for Audio and Captions, and enable the switch for Live Captions.
- High contrast mode: To increase the legibility of things on your screen, you can turn on high contrast mode. From Accessibility in the settings app, choose Display and Magnification, and then enable the switch for Color inversion.
- Button navigation: To make a ChromeOS tablet easier to use and worry less about swiping features, you can turn on button navigation. From Accessibility in the settings app, choose Cursor and touchpad, and then click show navigation buttons in tablet mode.
- Screen reader: If you have trouble reading what's on your screen in ChromeOS, you can have your device read things aloud for you with a feature called ChromeVox. Just press Ctrl + Alt + Z on your keyboard to trigger it.
- Reading mode: Now in beta testing in ChromeOS is a Reading mode feature. When it's rolled out to your device in a future ChromeOS update, you'll be able to get to it by clicking the side panel icon in Google Chrome, and choosing Reading mode. You'll see content from the webpage in the sidebar, helping you better comprehend things without ads or images.
Parental control settings in ChromeOS

Similar to Windows PCs and Macs, ChromeOS has parental controls. The easiest way to get started with these parental controls is to set up your Chromebook with a child account, usually right out of the box. But if your child is already using a Chromebook without the controls, you can add them to the account by going to the ChromeOS settings app, choosing Accounts in the sidebar, and then click Set up next to Parental Controls. From here, you have full management over the account and can install the Family Link app on your mobile phone to manage your Child's Chromebook with the following controls.
- App limits
- Blocking apps
- Blocking websites in Google Chrome
- Adding a parental access code to make changing settings harder
- Adding screen time limits
Tips for switching from Mac to ChromeOS

While macOS and ChromeOS have a lot in common, both being Linux-based, there are still some important differences. Some of the keys you're used to on your Mac are missing on ChromeOS, and it also takes some adjustment to get used to cloud storage. Below we'll look at the three most important changes when moving from macOS to ChromeOS.
- Command key replacement: The Command key is an integral part of keyboard shortcuts on macOS. In ChromeOS, the Ctrl key is equivalent to the Command key. Perhaps the most annoying thing is the Ctrl key is a bit further to the left, making it a little more difficult to reach. If you want to remedy this situation, use Chrome's versatility to swap the Ctrl and Alt key functionality.
- Viewing all open browser windows: Zooming out on all available windows is a feature all Mac users are accustomed to. In ChromeOS, it's incredibly easy to navigate through browser clutter. To switch between several tabs fast, you can swipe with three fingers to the right or left (or up or down depending on if you have reverse scrolling turned on). This feature makes it easy for you to get a sense of everything you’re working on. From there, you can organize and close windows.
- Downloading new apps: Loyal Apple users know to head to the App Store on Mac or iOS to download brand-new apps. On ChromeOS, you can download supported Android apps, downloaded via the Google Play Store. This opens up a wide array of possibilities, with millions of productivity apps and games available. Both web apps and Android apps support shortcuts and are easily accessed via the Launcher.
You're now ready to begin using your new favorite Chromebook in style. With this light cloud-based operating system, you'll get great battery life and the versatility to use any Android app. At this point, your Settings should be tuned just enough to get you started, but there are a lot of other tricks still to learn.
Be sure to check out our guides on other ChromeOS shortcuts, find out how to run Linux apps with ease, and check out some awesome docks for your new machine.