Quick Links
If you've been an Android enthusiast lurking in the modding scene, or an app developer for any length of time, sooner or later, you will stumble upon a neat tool called the Android Debug Bridge, or ADB for short. It's extensively used in Android Studio as a command line companion utility. Android developers also use it as a standalone solution to manually install and test apps on Android smartphones as well as emulated Android devices.
But there's a lot ADB can do, and most of it isn't only useful to developers. Even if you aren't a developer, and you're reading this article, there's a good chance you've probably used ADB once or twice to sideload an app or tweak a permission. But that isn't all ADB can be used for. Keep reading for some tips and tricks for using ADB you might not have known about.
You'll need to have ADB up and running on your computer. Be sure to check out our article on how to install ADB if you need help. In case you're using Windows, you also need to install the appropriate OEM USB drivers for your Android device.
Shell access
If you've used ADB before, you may be used to running commands all in one line. But you can also use ADB to open a terminal shell on your device and run commands directly. And it's easy!
In your terminal or command prompt window:
adb shell
You'll then be greeted with a $ symbol where you can run commands directly on your device.
Connecting to multiple devices
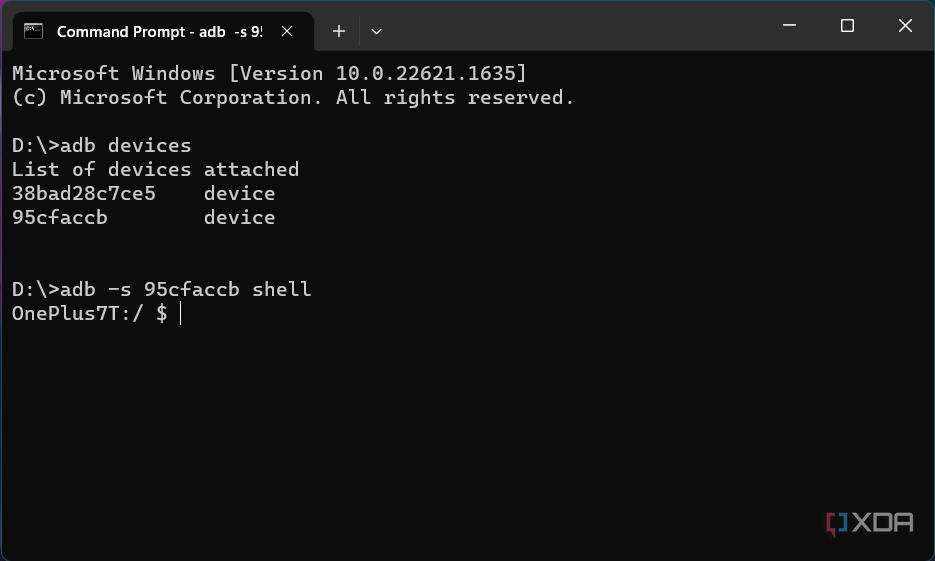
ADB can communicate with multiple devices at the same time. However, you must specify the target device when issuing ADB commands in such scenarios.
To do this, you’ll need to know the serial number of the target device. You can get the serial by using the devices command:
adb devices
Now, use the -s option to specify the serial number of the target device. Example:
adb -s <serial number> shell
Transferring files
For command line aficionados, ADB provides a very easy way to transfer files to and from your Android device. Just use the pull command to copy files and directories from the device and the push command to copy files and directories to the device:
If you want to copy a file or directory with its sub-directories to the Android device:
adb push local_path device_path
-
Example:
adb push D:\image.png /sdcard
The following command will copy a file or directory with its sub-directories from the Android device to the host PC:
adb pull device_path local_path
-
Example:
adb pull /sdcard/backup_April.tar D:\Backup
Logging
Android Studio provides the Logcat window, which supports displaying logs from your device in real time. However, it's not exactly useful for batch processing. Fortunately, Android devices ship with the logcat command available through ADB, which can be used to dump system and application log messages and print them to the screen.
The basic syntax is as follows:
adb logcat
To know more, take a look at our tutorial on how to take system logcats, kernel logs, and dmesg on Android.
Easter eggs
Google offers two nifty easter eggs related to the logcat command.
-
The first one is lolcat, a nod to the LOLcat meme. It gives the same output as the regular logcat command.
adb lolcat -
The second one is longcat, which is equivalent to the logcat -v long command. It displays all metadata fields and separate messages with a blank line.
adb longcat
Listing installed apps through ADB
To see the installed apps on your device, you can use the following command:
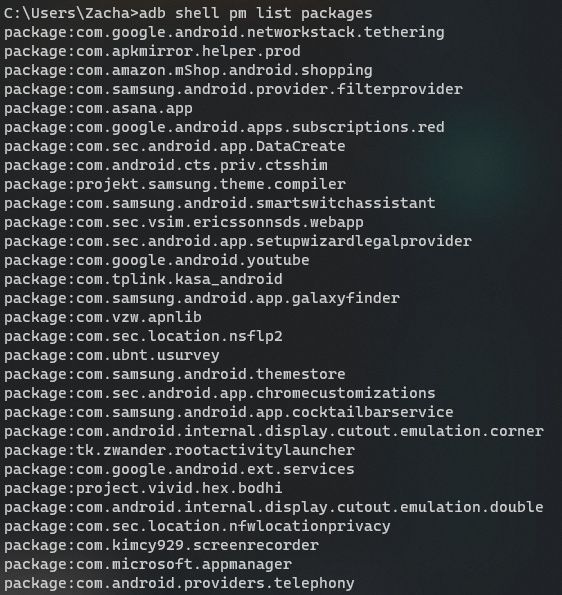
adb shell pm list packages
This will return a list of the package names of the installed apps, with each one on its own line prepended with package:.
Options
There are also some options you can use to retrieve more specific lists.
- -f will include the path to the base APK for each app, along with its package name.
- -a will make sure all known non-APEX packages are returned.
- -d will cause the command to only return disabled packages.
- -e will cause the command to only return enabled packages.
- -s will cause the command to only return system packages.
- -3 will cause the command to only return third-party packages.
- -i will include the installer package name for each package.
- -U will include the package UID for each package.
- -u will include uninstalled packages.
- --show-versioncode will include the version code for each package.
- --apex-only will only return APEX packages.
- --uid <UID> will only show packages with the given UID.
- --user <USER_ID> will only show packages belonging to the given user ID.
Installing and uninstalling apps through ADB
This is a relatively common use of ADB, but it's worth mentioning anyway. Among other ways, you can also make use of ADB to install and uninstall Android apps to your Android device.
Installing an APK
If you have an APK on your computer, you can install it to your device with the following:
adb install -r someapk.apk
Remember to replace someapk.apk with the full path to the APK you want to install.
Options
There are a bunch of options for installing APKs through ADB.
- The -r option allows ADB to install over an existing app (i.e., update). On Android Pie and later, you don't have to specify this option.
- The -R option, for Android Pie and later will cause the install to fail if the app is already installed.
- The -i option lets you specify an installer package name. This is what gets returned if Android wants to know what installed the APK.
- The -t option allows an APK with android:testOnly="true" in its manifest to be installed.
- The -d option allows the specified APK to be a downgrade to an already-installed app. This only works if both versions of the app are debuggable.
- The -g option for Android Marshmallow and later automatically grants all runtime permissions to the installed app.
That's not all of them. If you want a full list, you can check out the built-in documentation.
Multiple APKs and bundles
If you have a bunch of APKs you want to install at once, either from multiple apps, or because you're installing an app bundle, you can use ADB's install-multiple and install-multi-package features.
If all of your APKs are for one app, use install-multiple:
adb install-multiple apk1.apk apk2.apk ...
Otherwise, use install-multi-package:
adb install-multi-package app1.apk app2.apk ...
The options for these commands are similar to install, but with some limitations. Check out ADB's built-in documentation for which options are available.
Uninstalling an app
To uninstall using ADB, you'll need the package name of the app you want to uninstall. Check out the section for Listing installed apps if you haven't already.
Once you have the package name, uninstalling is as simple as:
adb uninstall <packagename>
You generally can't uninstall system or preinstalled apps using this command. You may be able to disable them with ADB, however. Check out the section Disabling and enabling almost any app for details.
Extracting APKs with ADB
There are plenty of reasons you might want to extract the APK(s) for an app. Maybe you want to back it up for future use, or maybe it's no longer available online and you want to transfer it to a different device.
Extracting an app using ADB is pretty simple. First, you'll want to find the package name of the app you want to extract. There are multiple ways to do this, but the easiest is usually to use your device's Settings app to view the list of all installed apps, select the one you want, and scroll down until you find the package name or app ID.
Once you have the package name, run the following command:
adb shell pm path <packagename>
This command will return the path of all APKs for that package name.
You can then use the following command to pull each APK to your computer:
adb pull /path/to/apk.apk
Backing up and restoring application data
Although Google has yet to come up with a iOS-esque one-click backup methodology, you can use ADB to back up and restore installed apps along with their data. However, the functionality is far from being perfect, and Google has already marked the feature as deprecated.
Back up
To back up a single application, with its APK:
adb backup -apk <package name> -f package_name_backup.ab
In case you want to back up all app data at once:
adb backup -f all -all -apk -nosystem
Since the restore module can't perform individual app-specific restoration, it's better to create a package-specific backups. The following command snippet (compatible with Linux/macOS and Windows Subsystem for Linux) can do it for you:
        for APP in $(adb shell pm list packages -3)
do
  APP=$( echo ${APP} | sed "s/^package://")
  adb backup -f ${APP}.backup ${APP}
done
Restore
First, you need to install the saved APK;
adb install <package name>.apk
Then you can restore its data:
adb restore package_name_backup.ab
To reiterate, ADB backup and restore functionalities have multiple caveats, including variable results depending on the ROM
Listing app components
An app's components are things like its Activities, BroadcastReceivers, Services, and so on. Sometimes it's useful to know the names of these components in a specific app, especially if you want to launch hidden Activities or send a broadcast with specific data.
Unfortunately, ADB doesn't have a very clean way of listing an app's components. But it is possible. Run the following command:
adb shell dumpsys package <packagename>
A whole bunch of text will be returned.
- Scroll until you find the Activity Resolver Table title to see the Activities.
- Look under Receiver Resolver Table for BroadcastReceivers.
- Check the Service Resolver Table for Services.
- And so on.
Each component will show the action needed to launch it, the name of the component, and possibly some extra information.
Alternatively, if you want an easier way to see Activities, Services, and Receivers, you can use the Root Activity Launcher app from XDA Recognized Developer Zacharee1. It will show you those components for each app, along with a bunch of other handy features.
Launching activities, services, and broadcast receivers
ADB can also be used to launch Activities, start Services, and notify BroadcastReceivers. You can even specify data URIs and Intent extras if needed.
To launch components, you'll need the component name of what you want to launch. You can see how to get that from the Listing App Components section.
The command syntax for launching an Activity is something like this:
am start -a <action> -n <component>
The command syntax for starting a Service is something like this:
am startservice -a <action> -n <component>
The command syntax for notifying a BroadcastReceiver is something like this:
am broadcast -a <action> -n <component>
In most cases, for Activities and Services, you don't need to specify an action explicitly. You'll usually only need it if the component uses one other than android.intent.action.MAIN.
On top of the basic syntax, here's how to specify more data to pass. In general, all data values should be enclosed in double-quotes.
- -d allows you to specify a data URI.
- -e <key> <value> or --es <key> <value> allows you to specify a String extra.
- --esn <key> allows you to specify a null String extra.
- --ez <key> <value> is used to specify a boolean extra.
- --ei <key> <value> is used to specify an integer extra.
- --el <key> <value> is for specifying a long extra.
- --ef <key> <value> will pass a float extra.
- --eu <key> <value> passes a URI extra.
- --ecn <key> <value> can be used to specify a component name extra.
- --eia <key> <value1>,<value2>,... will pass the values as an Integer[] extra.
- --eial <key> <value1>,<value2>,... will pass the values as a List<Integer>.
- The same array and list arguments also work for longs, floats, and Strings. Just replace the i with the appropriate letter.
- -f allows you to specify a flag.
There are even more behavior options you can use, so check out the built-in documentation for details.
Disabling and enabling almost any app
System apps in Android can't be uninstalled, and unfortunately, a lot of them also can't be disabled through Settings. While ADB won't let you uninstall them, it may help you disable them.
First, make sure to get the package name of the app you want to disable. Then, try these commands. If one fails, try the next option.
- pm disable <package>
- To re-enable, use pm enable <package>
- pm disable-user --user 0 <package>
- To re-enable, use pm enable <package>
- pm hide <package>
- To re-enable, use pm unhide <package>
- pm suspend <package>
- To re-enable, use pm unsuspend <package>
- pm uninstall -k --user 0 <package>
- To re-enable, use pm install-existing <package>
- This one effectively uninstalls the application from your user profile. While the command to re-enable should work, there's no guarantee it will. You may need to factory reset to restore the app.
- If you're using multiple user profiles on your device, make sure to replace 0 in the commands above with the actual user ID you have.
To know more, check out our tutorial on how to uninstall carrier and OEM bloatware without root access.
Capturing screenshots
Most Android ROMs offer two handy shell utilities - screencap and screenrecord - for taking screenshots and recording screen activities, respectively. You can call them directly from the ADB shell to capture a static screenshot or a video snippet of your phone screen and save it directly on the device's internal storage.
The syntax for capturing a screenshot is pretty straightforward:
adb shell screencap /sdcard/screenshot.png
Similarly, if you need to grab a dynamic screengrab, do the following:
adb shell screenrecord /sdcard/recording.mp4
As you might expect, the screencap tool is rather simple, whereas the screenrecord utility offers several parameters. The options for the latter are as follows:
- --size WIDTHxHEIGHT
- Set the resolution of the video file (e.g. "1280x720"). By default, it tries to take the target device's main display resolution (if supported), and falls back to 1280x720 if not.
- --bit-rate RATE
- Set the video bitrate, in bits per second. The value may be specified as bits or megabits, e.g. '4000000' is equivalent to '4M'.
- --bugreport
- You can add additional information, such as a timestamp overlay, which can be useful to illustrate bugs.
- --time-limit TIME
- Set the maximum recording time, in seconds. Default / maximum is 180.
- --display-id ID
- Specify the physical display ID to record. The default one is set to the primary display. See "dumpsys SurfaceFlinger --display-id" for valid display IDs.
- --verbose
- Display in-depth information regarding the recording session.
You can further extend the capabilities of Android's built-in screen capture utilities by scrcpy. It's an open source screen mirroring solution, which utilizes the power of ADB.
Transferring binary data between the PC and the Android device
In case you don't want to spawn a full-fledged ADB shell, but like to incorporate streamlined passthrough of binary data in between the host PC and the target Android device, you can make use of the exec-in and exec-out commands.
Despite their prolonged existence, the exec-in and exec-out commands are still undocumented. They might lead to file corruption due to the way different shells handle inputs and outputs. Use with caution.
The first one helps you to execute a command on Android and feed the unfiltered console input as its parameter, while the second one does the exact opposite, i.e. run a command on Android and capture its unfiltered binary output by the host OS.
Example:
adb exec-out "screencap -p" > "D:\screenshot.png"
This will use the screencap command of Android to capture a screenshot of the phone's display, but directly saves it as screenshot.png in the D: partition of the host PC (provided it's running Windows). On the other hand,
adb exec-in "cd /sdcard && tar -xf -" < "D:\backup.tar"
This will extract the contents of the backup.tar file stored in the D: partition of the host PC (running Windows) at the root of the internal storage of the Android device.
ADB is an incredibly powerful tool, and it can do so much more than just what's above. The commands in this article are just a useful starting point. For more advanced usage, check out commands like cmd -l to see different services you might be able to interact with and ls -l /system/bin to see the different command executables available in your Android ROM.
For other Android trips and ticks, check out our guides on how to root your Android smartphone, how to install TWRP recovery, and how to install a custom ROM on your Android device.


