Like the Google Nexus series, the Google Pixel smartphones are among the easiest devices to unlock the bootloader, root, and install custom ROMs and kernels. The 2018 Google Pixel 3 and Google Pixel 3 XL will be no different. In fact, it's already possible to root the Pixel 3 and Pixel 3 XL thanks to the most recent update of the popular systemless-root tool called Magisk. He has released version 17.3 of Magisk and you can read about the release notes here. Unlocking the bootloader of the Pixel 3 series takes seconds, and getting your device up and running with Magisk takes minutes. If you've ever unlocked the bootloader of and rooted a Google Nexus, Google Pixel, or OnePlus device, you shouldn't have any issues unlocking your Pixel 3 and installing Magisk. For those of you who need a refresher, here's a tutorial to guide you through the process.
Special thanks to XDA Recognized Developer topjohnwu, the lead developer of Magisk, for all the work that he does. Without him, this wouldn't have been possible. Please consider supporting him on Patreon. Follow him on Twitter for teasers of his upcoming work.
Part 1 - Unlock the Google Pixel 3's Bootloader
Note: Unlocking the bootloader will wipe all the data from your device. This includes all media saved to the device's internal storage such as pictures, videos, music, documents, etc. Backup any important files to your PC or cloud storage before proceeding.
- Open the Settings app.
- Go to System.
- Tap on About phone.
- Scroll down and tap on Build number 7 times until it says you're now a developer.
- Go back one page and near the bottom of the list, you should see "Developer options."
- Without scrolling down, you should see an "OEM unlocking" option. Enable it. For security purposes, it may ask you to input your lock screen PIN/password if you have one set.
-
Scroll down a bit until you see "USB debugging." Enable it.
- Plug in your Pixel 3 into your PC. Follow these steps to set up ADB and Fastboot on your PC. If you only have access to a Chromebook, you can follow this guide to set up ADB and Fastboot on Chrome OS.
-
Make sure your PC recognizes your Pixel 3 by opening up a command prompt/Power Shell/Terminal in the same directory where you saved the ADB and Fastboot binaries and entering the following command depending on your OS:Windows Command Prompt:
adb devices.\adb devices./adb devices -
Now, reboot to the bootloader menu. You can either do this by holding the power and volume down buttons while booting up, or by entering the following ADB command:
adb reboot bootloader -
Once you're on the bootloader menu, you'll now have to switch to using fastboot command to communicate with your device. To unlock the Pixel 3's bootloader, enter the following command:
fastboot flashing unlock -
You should now see text on screen warning you about the potential risks of unlocking the bootloader. On the screen next to the power and volume buttons, you should see some text. Press the volume up key until it says "unlock the bootloader." Once it says this, press the power button.
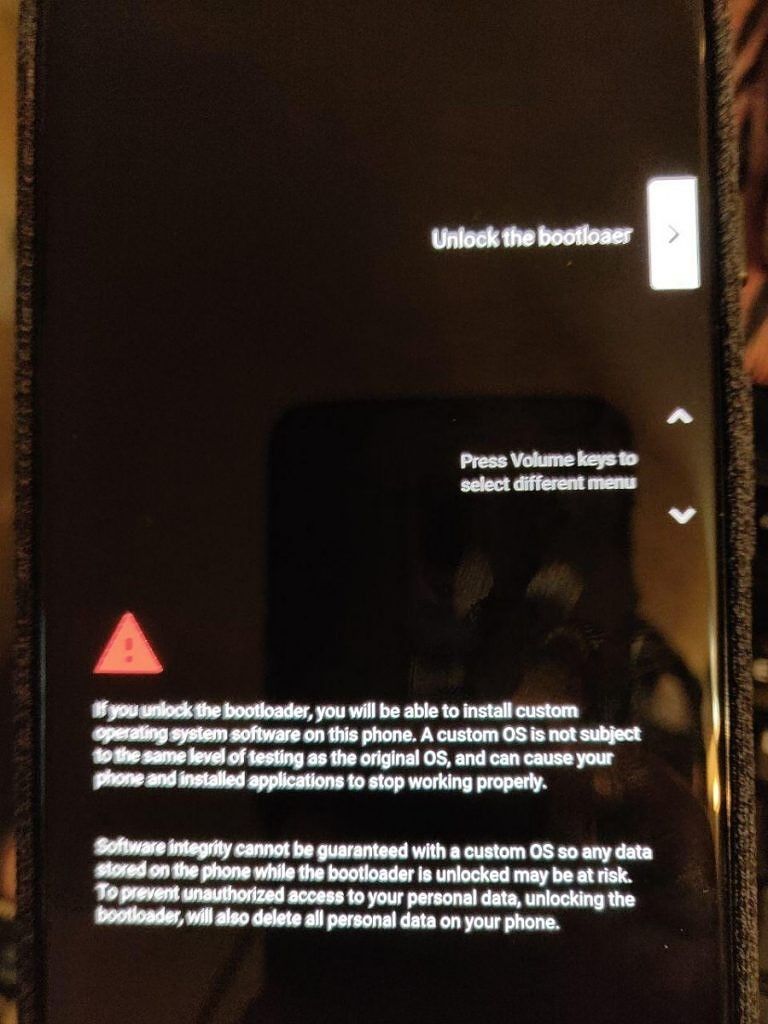
- The phone will unlock the bootloader and reboot back to the bootloader menu. This time, the bootloader will show a red warning icon and "unlocked" text.
-
Now, reboot your phone back to the Android 9 Pie OS. You can do this by sending the following fastboot command:
fastboot reboot - Congratulations, your Google Pixel 3 or Google Pixel 3 XL now has an unlocked bootloader! You'll see a warning message that your phone's bootloader is unlocked on every boot, but don't worry about that as it doesn't affect your day-to-day use.
Part 2 - Rooting the Google Pixel 3 with Magisk
With an unlocked bootloader, you can now boot modified boot images. For Magisk to work, you'll need to patch the Pixel 3's boot image. The easiest way to do this is to install a custom recovery like TWRP to your device so you can use the Magisk installer script.
- Since your device has been wiped, you'll need to go back and re-enable Developer Options and then re-enable USB Debugging. Make sure your Pixel 3 is still recognized by your PC.
- Download the TWRP image (.img file) for the Google Pixel 3 or Google Pixel 3 XL from the link below and save the file to the same directory on your PC where your ADB and fastboot binaries are located.
- Download the latest Magisk installer zip (.zip file) from this thread and save it to the Download folder on your Pixel 3 or Pixel 3 XL.
- (Optional) Download the TWRP installer script from the TWRP pages above (.zip file) if you wish to install TWRP rather than boot from the bootloader each time. Save it to your Download folder on your Pixel 3 or Pixel 3 XL.
- Reboot to the bootloader menu again.
-
On the bootloader screen, enter the following fastboot command to temporarily boot the TWRP patched boot image:
fastboot boot <insert_name_of_TWRP_image_here>.img - After a few seconds, your phone should exit the bootloader menu and reboot to TWRP recovery.
- Tap on Install.
-
(Optional) If you want to install TWRP so you don't have to do "fastboot boot" each time, follow these steps:
- Find the TWRP installer script you saved to your Download folder.
- Tap on it and use the slider to install it.
- Reboot to the OS and let it boot back up all the way.
- Reboot back to the bootloader.
- Use the volume keys to scroll until you see "Recovery." Press the power button to now boot back into TWRP.
- Find the Magisk installer script you saved to your Download folder. Tap on it and use the slider to install it.
- Now, reboot back to the OS and check the status of your root by opening up Magisk Manager.
Part 3 - What do I do now?
What are some of the things you can do with your Pixel 3 or Pixel 3 XL after rooting with Magisk? Here's a short list I came up with off the top of my head:
- Install the Active Edge Mod to fully customize the squeeze gestures on the Pixel 3. (Note: this has not yet been updated to support the Pixel 3, but the developer is working on it!)
- Install custom themes for system apps or third-party apps via the Substratum theme engine. Similarly, you can use an app like Pluvius to dynamically theme your system based on the current wallpaper.
- Make complete app backups using Titanium Backup.
- Re-enable call recording since Android Pie took it away for unrooted users.
- Miss the blob emojis from Android Nougat? You can get them back with the Blobmoji Magisk Module.
- There's a ton of audio mods in the Magisk Module repo. Check them out for a better music playback experience!
- Like the stock Gboard keyboard app? Check out these Gboard themes.
- A big fan of Google apps and services? With root, you can enable a lot of the in-development features before they roll out for the general public. Check out our tutorials for plenty of examples.
- Not a fan of the Google Pixel Launcher? You can use a third-party launcher like Lawnchair but with root, you can integrate it into the recent apps overview and gesture navigation.
- Customize the default system media, fonts, boot animation, and more to add a little flavor to your software.
- Get YouTube Vanced—an enhanced version of the YouTube app for Android.
- This app we made lets you customize the display saturation level if you like punchier colors.
You've probably heard that unlocking the bootloader and rooting your device with Magisk means you won't be able to play certain games like Pokémon Go and Fate/Grand Order or use banking apps. However, there are features like MagiskHide that can hide the fact that your device has been modified so you can continue using your favorite apps and games! Unlocking the bootloader will impact how you take updates, though. You'll need to learn how to sideload monthly security patch updates which is actually fairly easy to do.
Lastly, if you want even more control over your device, you'll be able to flash custom ROMs and kernels on your Pixel 3 once they're made available for the two devices. Custom ROMs can offer a lot of options that aren't available on the stock software. Custom kernels let you tune the performance of your device to squeeze more battery life or get even more frames in your favorite games. Since the Google Pixel 3 and Pixel 3 XL have just been released, there aren't any custom ROMs or kernels available for the device just yet. But keep an eye out on the XDA forums for both devices if you're interested in the custom development scene.
Join the Google Pixel 3 Forums
Join the Google Pixel 3 XL Forums
Finally, since the Pixel 3 and Pixel 3 XL support A/B dual partitions for seamless updates, you should read up on how that impacts modding if this is your first time with an A/B devices.