
Discord has evolved a lot over the years and it now stands as a reliable platform for not only gamers but for anyone looking to connect with their peers over messages, video chat, and more. Many even use it as an alternative to WhatsApp and other popular messaging applications, especially thanks to its great emphasis on groups and communities. Discord has millions of daily active users and a good chunk of those use a bot on a day-to-day basis to automate things. If you use Discord in any capacity then there's a good chance you've used a bot. If you're wondering how to create one yourself then you're in the right place. In this article, we'll tell you how to make a Discord bot:
Navigate this article:
- Prerequisite
- How to create and add a Discord bot to your server
- How to assign bot function and host a Discord bot
- Closing thoughts & join XDA's Discord server!
Prerequisites
Creating a Discord bot is a relatively simple task. You do need a little bit of programming knowledge to set things up, but the complexity of the code depends on the kind of bot you're trying to make. Let's take a look at a few things you need to get started. First, you need a Discord account, which you probably have. If not, you can create one for free by heading over to the Discord homepage. You can also download the Discord client and use it on your gaming laptop or even a phone.
Once done, you need to set up your own server to use the bot. You can then invite the bot to your server easily by following a few simple steps. Once the bot has arrived on your server, you can then code a function for it and use it in your server or assign it to other servers to which you have admin rights. To assign a bot function, we'll use Node.js to access the discord.js Node library. You can download the latest version of Node.js from the official website.
Additionally, we'll also need a code editor to write and modify the bot functions. We'll be using Visual Studio Code in this tutorial, although you're free to use whichever you like.
How to create and add a Discord bot to your server
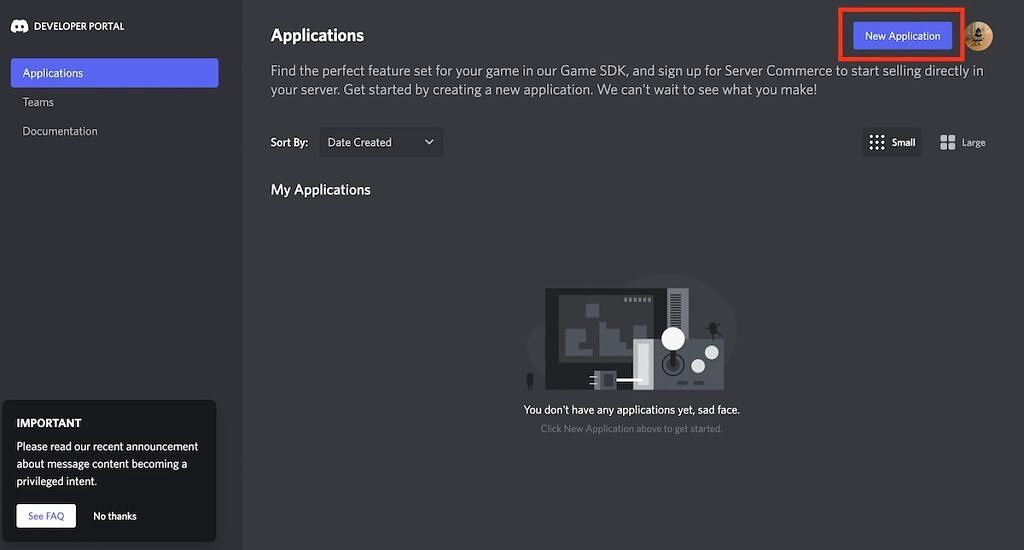
The first step is to create an application on Discord for your bot to work. The idea here is to generate a token for your bot so that Discord recognizes the code. For this, you'll need to head over to Discord's applications page. You'll be sent directly to the page once you log in with your Discord account where you'll see a list of your apps. Don't worry if the list is empty because we'll be creating one now.
-
Hit the New Application button to get started.
-
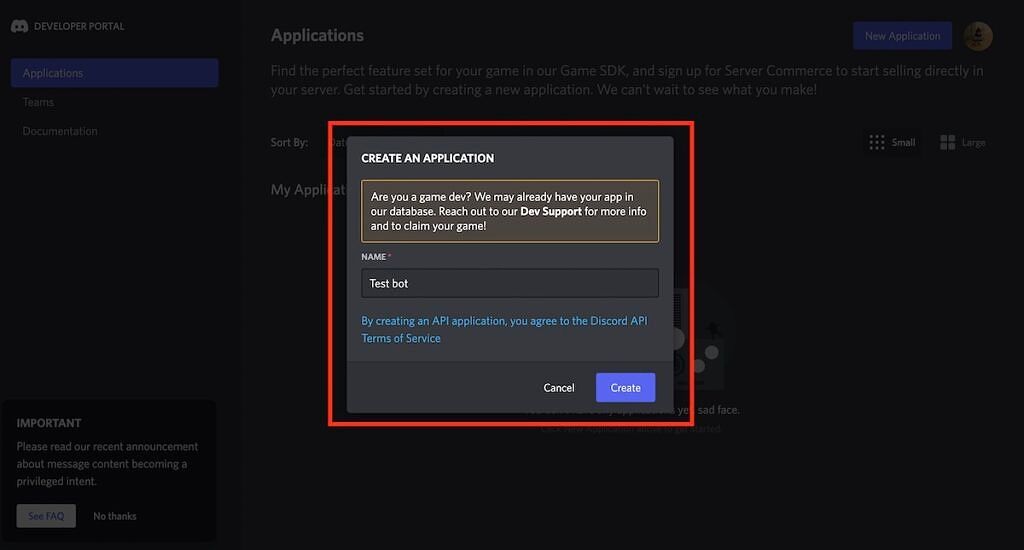
Now, give a name to your application and hit Create.
- It'll now take you to a page in which you can enter details such as your app's description, add tags, an app icon, and more. Once done, hit the Save Changes button to proceed.
-
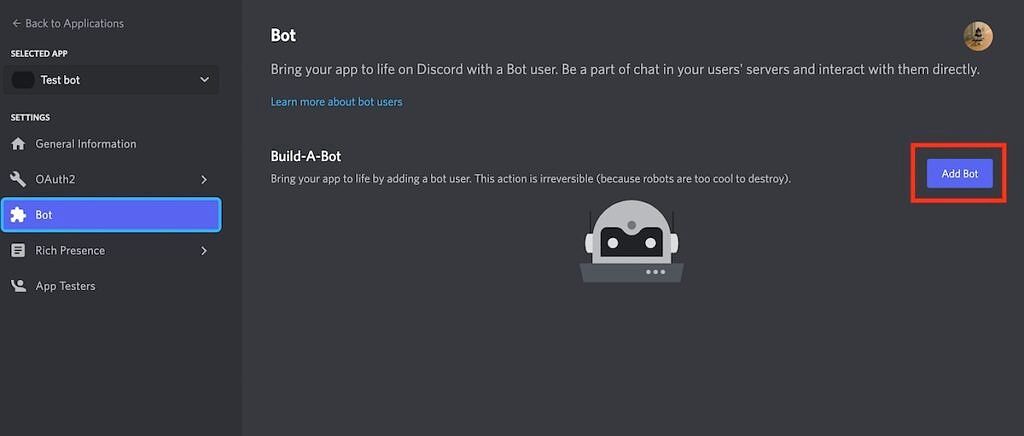
Now, look for the Bot option in the menu list on the left sidebar. Tap on it to open the Bots page and press the Add Bot button. Allow permission to create the bot when prompted.
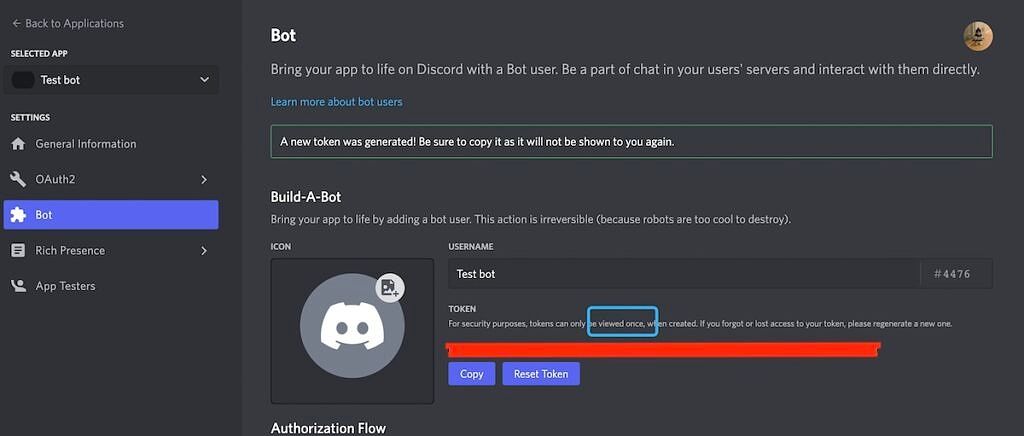
- You'll now see a security token for your bot on the next page. If the token hasn't been generated, simply tap on the Reset button to create a new token. Copy this token ID as we'll need it in the following sections.
-
This particular token allows you to control the bot, meaning you shouldn't share this with anyone. If you think this token has been compromised, then simply come back to this page and hit the reset button to create a new one.
-
Now, look for the OAuth2 option in the menu on the left sidebar and click on it to find your CLIENT ID. It's a long string of numbers that you need to copy and paste to this URL below -- replace the word CLIENTID with the actual CLIENT ID that you just copied -
https://discordapp.com/oauth2/authorize?&client_id=CLIENTID&scope=bot&permissions=8 -
Simply paste this particular URL into your web browser and hit enter. It'll open a page in which you can tell Discord where to send your bot. Select the server to which you want to add your new bot from the dropdown menu like so -
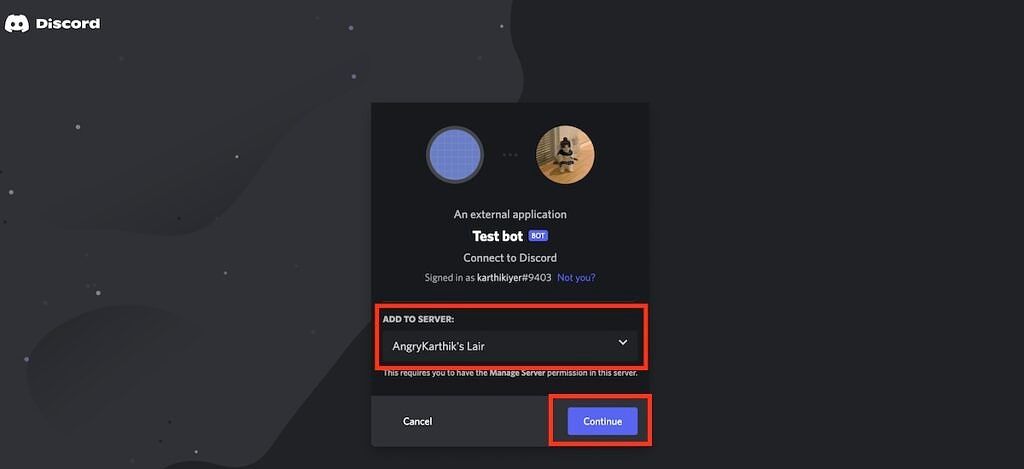
- Click on Continue and confirm whether or not you want to grant Admin rights of the server to your bot. You can grant or revoke the admin rights later too, so don't sweat over this option.
-
Once you add the bot to your server, you'll see a message confirming the arrival of the bot. That's how you'll know it worked. You'll also see the bot in the members' column on the right side.


Well, that's it, you've now created a Discord bot for your server. If you followed all the steps carefully, you should be able to see the bot on your server. The bot will stay offline until you define a function for it with a code, and sync it with the Discord platform. This is where the real work begins as you'll set up a few parameters and tell your bot what you want it to do.
How to assign bot function and host a Discord bot
Now, follow the steps below to create and host a discord bot on your PC:
For this tutorial, we'll be creating a simple 'Ping-Pong' Discord bot which, as the name suggests, will reply with 'Pong' every time you type 'Ping'.
- Create a new folder anywhere on your PC or Mac. We created a 'New Folder' on the Desktop in our Windows PC for this tutorial.
-
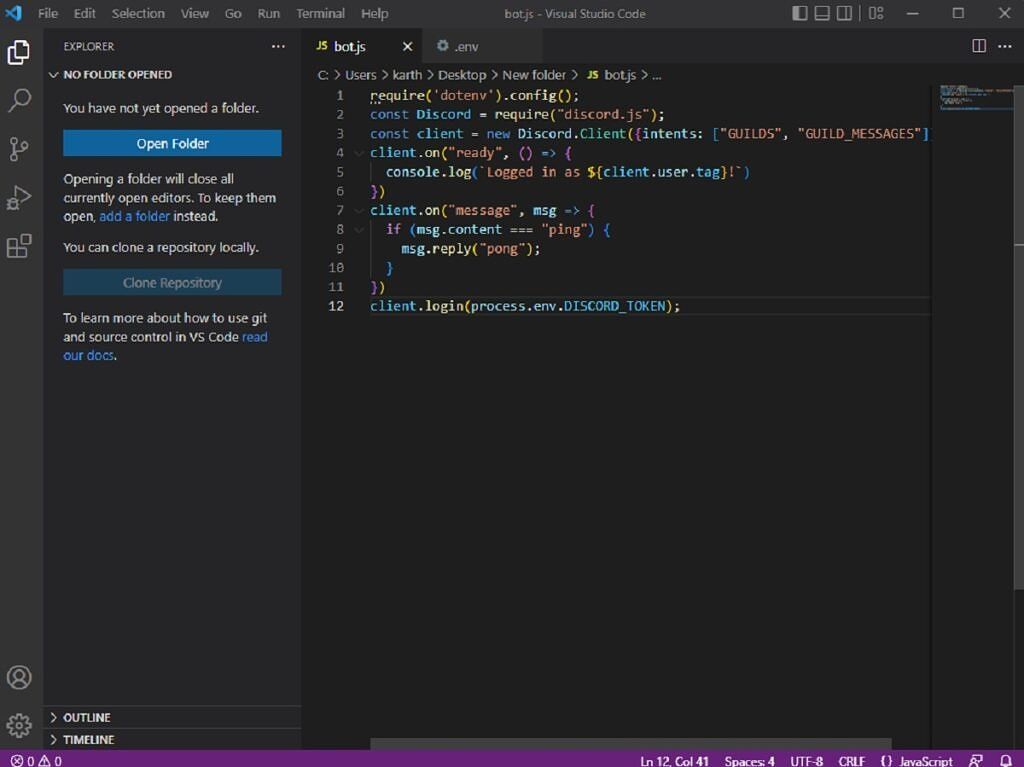
Now, open Visual Studio Code and create a new file with the code mentioned below. Replace "Paste your bot's token here without quotes" with the bot’s token you copied earlier.
DISCORD_TOKEN= "Paste your bot's token here without quotes."

-
Next, create a new file and add the following code. Once done, save this particular file as bot.js within the same folder. This code will add the function to your Discord bot. It'll reply with "pong" every time you type "ping".
require('dotenv').config(); const Discord = require("discord.js"); const client = new Discord.Client({intents: ["GUILDS", "GUILD_MESSAGES"]}); client.on("ready", () => { console.log(`Logged in as ${client.user.tag}!`) }) client.on("message", msg => { if (msg.content === "ping") { msg.reply("pong"); } }) client.login(process.env.DISCORD_TOKEN);
-
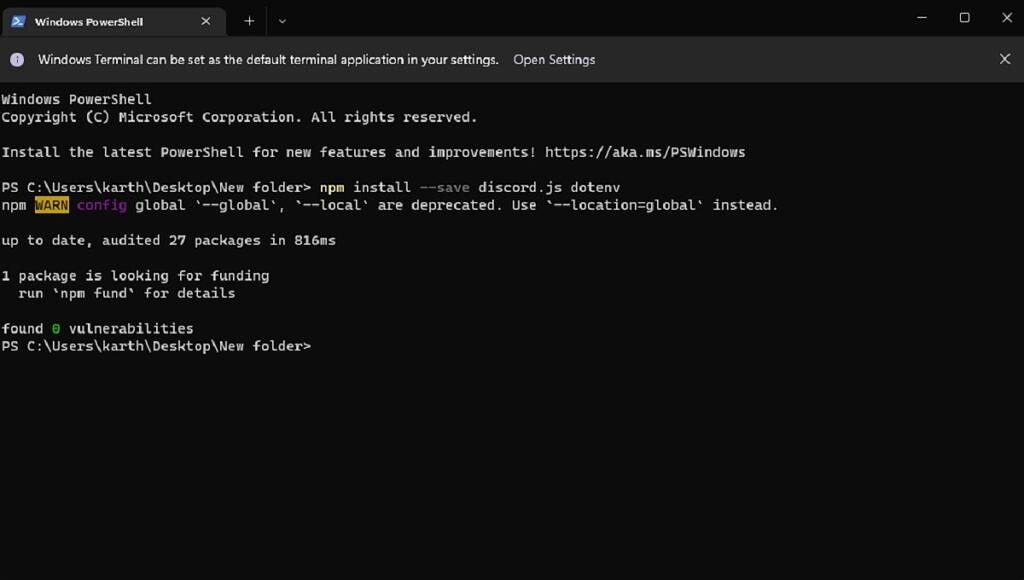
Now, open the terminal window from the New Folder that you created and install the Discord.js library using the following command. You'll need Node.js installed on your system for this to work, so keep that in mind.
npm install --save discord.js dotenv
-
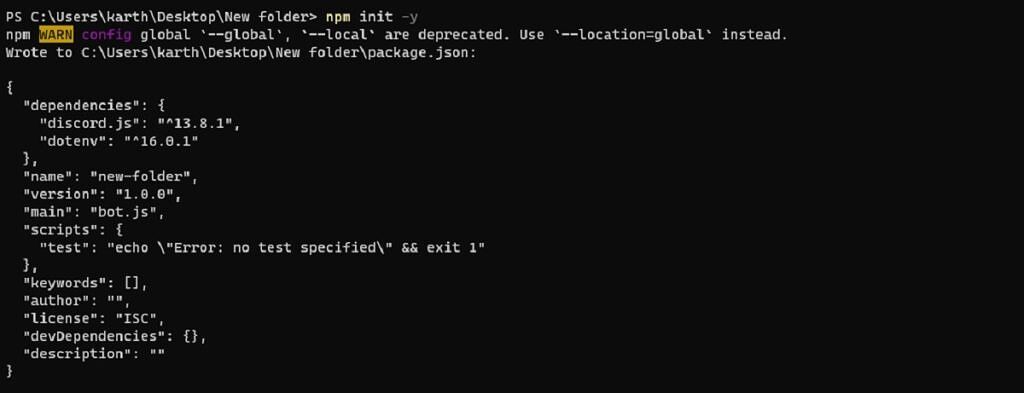
The next step is to create a package.json file. Use the following command to create it:
npm init -y
-
Lastly, you can now use the "node bot.js" command to run the bot.


As soon as you run the node bot.js command, you'll notice that the Discord bot in your server will be online. You can then test the bot by typing 'ping' to which it will respond 'pong'.

You can also create a Discord and host it in the cloud for others to use. For that, you'll have to use an online IDE such as Replit to host your code.
The complexity of the coding process depends on the function you want to assign to your bot. The coding process for a simple 'Greeting Bot', for instance, isn't going to be as complicated as, say, a 'Music Bot' that can play music from your preferred platform. You can also create a bot to moderate your server and even kick members that repeatedly break rules in your server. There are tons of useful Discord bots out there, so the possibilities are endless, really. Top.gg is a good place to look for Discord bots if you don't want to go through the hassle of coding. Just pick up a bot from the website and make changes as necessary to modify the bot according to your needs. There are plenty of options to choose from so be sure to use the search bar on the top to find what you're looking for.
Well, that brings us to the end of this particular tutorial. There are a ton of useful Discord bots out there right now, so we highly recommend doing a Google search to see if somebody's already created a bot to automate your process. And before you leave, we also suggest you join XDA's Discord server in which you'll find like-minded individuals and also stay up-to-date with all things XDA. So which Discord bot are you going to create first? Let us know by dropping a line in the comments below.