
Quick Links
The latest stable version of Android, Android 13, has officially seen its public release back in August 2022. As expected, if you’ve got an eligible Pixel smartphone, you can get in on the fun right now by downloading the Android 13 release for your device. Google also provides Generic System Images (GSI), which means the latest version of Android can be booted on non-Google Project Treble-compatible devices as well.
In case you have a Pixel 4, Pixel 4 XL, Pixel 4a, Pixel 4a 5G, Pixel 5, Pixel 5a, Pixel 6, Pixel 6 Pro, or Pixel 6a running an older build and wondering how you can install Android 13, just scroll down as we have a tutorial ready for you. The methods listed below are applicable to the Pixel Fold, Pixel Tablet, and the Pixel 7 series (including the 7a) as well.
You will need a PC/Mac with ADB and Fastboot installed to execute the installation process successfully. Windows users are suggested to install the latest USB drivers before proceeding.
While you can still download and flash preview/beta releases, those pre-stable builds are intended for developers only. As a result, you might encounter showstopper bugs and various system instabilities. Hence don't install them on your daily driver. Moreover, it is highly recommended that you back up your data, as a full flash will wipe the internal storage of the target device. Users are advised to exercise caution.
The three methods to install the update are:
- For supported Google Pixels: Sideload Android 13 via recovery and ADB
- For supported Google Pixels: Flashing the full factory image via Fastboot
- Any Project Treble-compatible Android device: Install Android 13 GSI
Method 1: Sideload Android 13 via recovery and ADB
To install an official Android 13 release on your Pixel phone, you can opt for sideloading the appropriate OTA package for your device from the recovery environment through ADB. Keep in mind that this method will also work for devices with a locked bootloader.
-
Download the update .zip file on your computer from here. For convenience, you can rename this file to a simpler name and place the file in the directory where ADB is located on your computer.
- Optional, but recommended: Verify the SHA-256 checksum of the file you have downloaded to ensure that the file has been downloaded completely and correctly.
- Enable USB Debugging on your phone -- Go to Settings > About phone > Tap Build number 7 times, (optionally) enter your pattern, PIN, or password to enable the developer options, and then navigate to Settings > Developer options and enable USB debugging.
- Connect your phone to your computer. Authorize your computer connection on your phone when the prompt comes up on your phone if this is the first time you are connecting with the ADB instance of this computer.
-
On your computer, run the command:
adb reboot recovery -
You should see “No command” on your phone screen. Now press and hold the power button of your phone. While you hold that, press the volume up button and let go of both buttons quickly. You should reach the Android recovery menu.

- Select the option Apply update from ADB from the recovery menu.
-
On your computer, run the command:
adb devices -
On your computer, run the command:
adb sideload "filename".zip - The update should install on your phone. Once the installation is complete, choose Reboot system now on your phone to reboot into Android 13.

Method 2: Flashing the full factory image via Fastboot
If you have an unlocked bootloader on a Google Pixel device, you need to flash the factory image of Android 13 via Fastboot. Usually, this is done through a flash-all.sh or flash-all.bat script file that is included in the downloaded file, but its default configuration also wipes the device completely. You can, however, retain your data by deleting the "-w" wipe attribute from the command within the script.
-
Download the factory image .zip file on your computer from here.
- Optional, but recommended: Verify the SHA-256 checksum of the file you have downloaded to ensure that the file has been downloaded completely and correctly.
-
Extract the .zip file, and copy and paste the resultant files onto your ADB and fastboot folder on your computer for convenience.
-
Optional: The resultant files would contain a flash-all.sh or flash-all.bat script file. Using a text editor, open the flash-all.sh if you're on macOS/Linux or the flash-all.bat script file if you're on Windows. Find and remove/delete the -w flag in the
fastboot updatecommand. This will skip the data wipe for your phone. To avoid compatibility issues, a data wipe is recommended, though.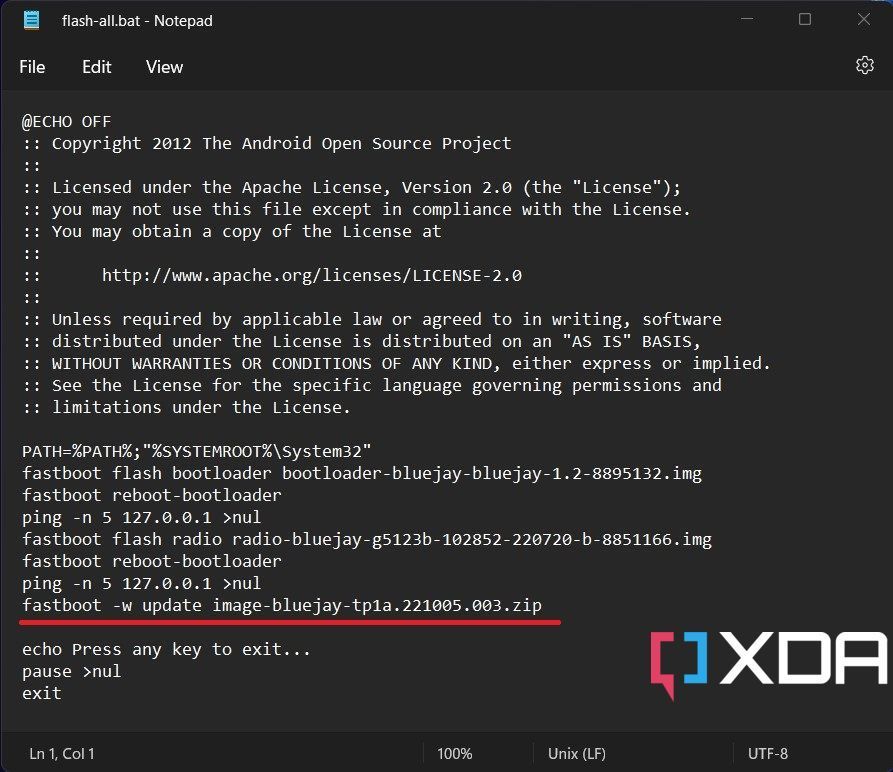
-
Optional: The resultant files would contain a flash-all.sh or flash-all.bat script file. Using a text editor, open the flash-all.sh if you're on macOS/Linux or the flash-all.bat script file if you're on Windows. Find and remove/delete the -w flag in the
- Enable USB Debugging on your phone -- Go to Settings > About phone > Tap Build number 7 times, (optionally) enter your pattern, PIN, or password to enable the developer options, and then navigate to Settings > Developer options and enable USB debugging.
- Connect your phone to your computer. Authorize your computer connection on your phone when the prompt comes up on your phone if this is the first time you are connecting with the ADB instance of this computer.
-
On your computer, run:
adb reboot bootloader -
On your Mac/Linux PC, run:
flash-all.sh - Once the script finishes, your device will reboot into the new OS.
Method 3: Install Android 13 GSI
Even if you don’t own a compatible Pixel smartphone, you can still technically install Google’s official GSI binaries to test Android 13, provided your device is compatible with Project Treble. You also need an unlocked bootloader. There exists a plethora of community-developed GSI builds as well, but discussing them is beyond the scope of this tutorial.
The last thing we need to say is that flashing a GSI will require you to factory reset your device, so be sure you’re prepared to lose app data before proceeding with this! We recommend you make an off-device backup (such as on your PC or an SD Card) in case anything goes wrong.
-
Download links for the official Android 13 GSIs can be found here. You should download the appropriate version based on your device’s architecture. To see which architecture your device has, run the following command:
adb shell getprop ro.product.cpu.abi- Optional, but recommended: Verify the SHA-256 checksum of the file you have downloaded to ensure that the file has been downloaded completely and correctly.
- Extract the .zip file, and copy and paste the resultant files (system.img and vbmeta.img) onto your ADB and fastboot folder on your computer for convenience.
- Enable USB Debugging on your phone -- Go to Settings > About phone > Tap Build number 7 times, (optionally) enter your pattern, PIN, or password to enable the developer options, and then navigate to Settings > Developer options and enable USB debugging.
- Connect your phone to your computer. Authorize your computer connection on your phone when the prompt comes up on your phone if this is the first time you are connecting with this ADB computer.
-
On your computer, run:
adb reboot bootloader- As mentioned earlier, the bootloader of the target device must be unlocked beforehand.
-
Next, we need to disable Android Verified Boot (AVB). To do that, run the following command:
fastboot --disable-verity --disable-verification flash vbmeta vbmeta.img-
Optional, but recommended: Enter the following to wipe the system partition:
fastboot erase system
-
Optional, but recommended: Enter the following to wipe the system partition:
-
Flash the Android 13 GSI:
fastboot flash system system.img -
Allow the image to flash, it could take a few minutes. Once that’s done, wipe the userdata partition:
fastboot -w -
Finally, reboot your device:
fastboot reboot - Hopefully, your device should boot into the new build of Android.
Alongside the supported Google Pixel devices, Android 13 as a major version is also available on a wide range of devices from different OEMs — either in the form of beta or stable builds. In case you’re looking for the answer to the question "how to install Android 13 on my phone?" take a look at the following OEM-specific trackers to find out: