Quick Links
Clipchamp is the new video editor that started being bundled with Windows 11 with the update to Windows 11 version 22H2. It's a web-based video editor and a company that Microsoft acquired in 2021, and it brings significantly improved video editing capabilities to Windows 11. It supports features like multi-track audio and video, plus it can export videos in up to 4K resolution (with the paid plan), and it even offers some stock assets. If you're not sure how to get started with Clipchamp, we're here to help.
What is Clipchamp and how much does it cost?
Clipchamp is a novice-friendly multi-track video editor akin to Apple's iMovie, though you can also think of it as a very simplified version of something like Adobe Premier Pro. It lets you bring in video clips, images, audio, and other animations and effects to create a professional-looking video.
It runs mostly on web technology, and it was founded in 2013. Microsoft acquired the company in 2021, and it quickly started being integrated into Windows 11. Prior to the acquisition, Clipchamp offered multiple paid plans and was severely limited for free users, but Microsoft has significantly improved the value of this tool.
The free plan is all you really need to edit normal videos. It lets you export videos in up to 1080p resolution and use any of your own assets to create videos, plus a series of templates and some stock assets from Clipchamp's library. There is a paid Essentials plan that costs $11.99 per month, and that lets you export videos in 4K and gives you access to a set of premium stock assets and filters. It also lets you create a brand kit so you can have a consistent brand if you're making professional videos frequently.

Clipchamp isn't fully included in Microsoft 365, but you do get access to premium filters (but not premium stock or 4K exports) if you're a Microsoft 365 subscriber without having to pay for the Essentials plan. Clipchamp is available as an app on Windows 11, but it works just as well through the Clipchamp website.
How to start a project in Clipchamp
When you first launch Clipchamp, you'll be greeted by the home page, which lets you start a new project. You'll need to create a Clipchamp account, though if you have a Microsoft account linked to Windows 11, this should be easy. Once you've logged in, the home page will look like this:

Here, you can choose from a few ways to start working on a new video:
- You can use the Create a new video button to start a new project from scratch.
- The Create a video with AI button lets you automatically create a video using the media you provide.
- Under Get inspired with a template, you can find templates to help you get started with a video.
You also have a history of your video projects below this so you can pick up where you left off.
Choosing a template
Clipchamp offers a wide range of templates for video across a range of categories. For example, Instagram templates will typically have a 1:1 aspect ratio since that's the format used more commonly there. There are templates for intros and outros you can add at the start or end of a video, templates for TikTok videos, and more.

Templates can be for videos in general but also for parts of them. For example, there are templates for social handle overlays, which you can use to promote your social network profiles in a video. It's worth exploring all the options here as there really is a lot to dive into to make the most of Clipchamp.
Making a video with AI
A relatively recent feature in Clipchamp is the ability to use AI to generate a video for you automatically based on the media you choose. If you choose the option to make a video with AI, You'll simply have to upload the files you want to use and choose a title, then Clipchamp will ask what kind of style you prefer. Once you've given it enough information, Clipchamp will analyze your media to create the video.

You can then choose the length of the video, and Clipchamp will prepare everything for you. Once the AI-generated project is finalized, you can preview it and change the music if you want to.
If you're happy with the result, you can either export it immediately or choose to edit it in the timeline for further tweaks.
How to use the Clipchamp video editor
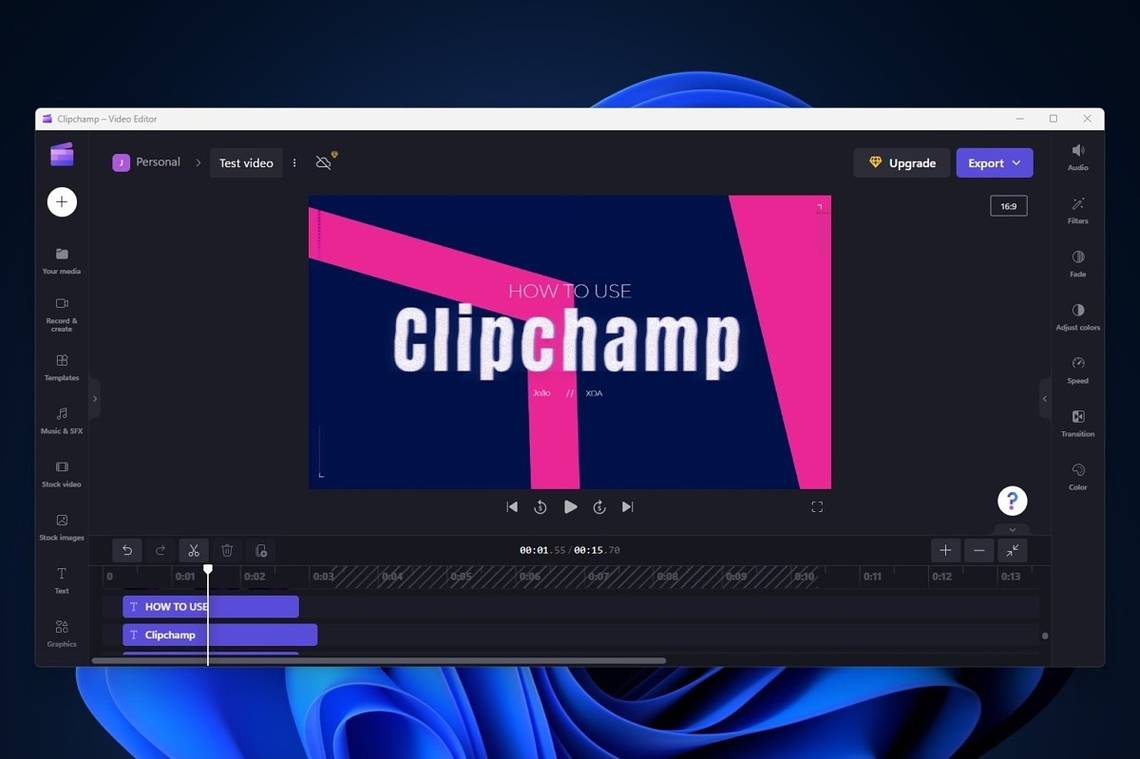
Once you've created a project, you're going to be taken to the video editing interface, which is where you'll spend the most time. The interface will likely look familiar if you've edited videos before. There's a main stage front and center which is where you can preview your video. Below that is the timeline, where you can see the media files you've added to the video. You can trim and move clips around to make the video look just right.

On the left side is your media panel, where you can manage the files you've added to the project and add them to the timeline. This area is split into multiple categories for different kinds of media, and it even includes a video and screen recorder, too, which we'll dive into later.
On the right, you have your effects and filters, which you can use to manipulate the current clip, such as by muting it, applying color filters, or changing the colors.
Using the timeline

The timeline is where you see all the elements that have been added to the video to show up in the final exported project. Clipchamp supports multi-track editing, so you can have multiple elements play at the same time, which lets you create overlays and complex visual effects. You can see a number of tracks here because we started with a pre-made generated by AI.
You can move clips around on the timeline by simply dragging them around. To create a new track, simply drag an item between the edges of existing tracks until you see a green line with a + (plus) sign to indicate a new track will be created.

There are buttons above the timeline that let you trim, delete, or duplicate a clip, too.
How to add or remove clips from the timeline
If you want to add more assets to the final video, you can use the pane on the left side to find the media you want to use, hover your mouse cursor over it, and click the + (plus) button. You can also drag the file into the timeline if you want to place it on a specific track or create a new track for it by dragging the file between the edges of existing tracks.

Of course, if you want to use your own media, you have to add it to the project itself before you can drag it into the timeline. Click the Your media button on the sidebar and then click Import media to add your files to the project.
To remove media from the timeline, right-click it and choose Remove.
Media and content tools
As we've mentioned, you can add all kinds of media to your Clipchamp projects. The controls for adding media are all on the left side of the screen, and you'll see the following options:

- Your media - Manage the media already in your project or add more media from local storage, cloud services, or from your phone by scanning a QR code. Adding your own media to a project doesn't automatically add it to the timeline, so you have full control of where you want to add things in the final video. You can also filter your existing media by type, which can be useful when you've added a lot of assets.
- Record & create - This tab allows you to record your screen or your webcam (or both) directly within Clipchamp. There's also a text-to-speech tool, so you can write text that's synthesized as an audio file you can add to the video. There are multiple languages and voices you can choose from for the text.
- Templates - Add content from pre-built templates, including outros, intros, or splash screens. Templates can include multiple files, such as audio, video, and images. Templates are automatically added to the timeline after the cursor position.
- Music & SFX - Add stock music and sound effects from the Clipchamp library to your video. You can choose from a range of genres and categories, so you can get a specific vibe. Some assets are available in the free plan, while others require you to pay for the Essentials plan.
- Video library - Add stock video footage from the Clipchamp library, including video overlays. Some assets are only available with the paid Essentials plan.
- Image library - Add images from the Clipchamp library to your video. This can include static video frames and overlays to add more flair to your video. Some assets are free, but most require an Essentials plan.
- Text - Add text to your videos, such as title screens, subtitles, and lower thirds. You can choose from a range of existing fonts or, if you have an Essentials plan, upload your own.
- Graphics - Add overlays, backgrounds, GIFs, or stickers to your video.
- Transitions - Add transition effects to the video, which can be useful when switching between different video files in the timeline.
- Brand kit - Access assets from your personal brand kit, including fonts, logos, and color palettes. This feature requires an Essentials plan.
Recording your own video

Clipchamp offers a convenient built-in tool that lets you record video using your webcam, screen recording, or both, so you can immediately add it to your project. When you choose the Record & create tab, you can choose what kind of recording you want. There's also a text-to-speech tool here that turns your written text into spoken dialog.
Once you choose which option you want, Clipchamp will ask you yo choose a camera and microphone to use for recording webcam video. There's also an optional Coach feature that can help you practice to record more professional-sounding video by warning you about long pauses, sounds like "um", and other things that can be distracting.

If you're also recording your screen, you'll be asked to choose what you want to record — it can be the entire screen, an app window, or a specific area of the screen. You can also choose to record system audio, though this is off by default.

Once you choose what part of the screen you want to capture, the recording will automatically start, and it can last up to 30 minutes. When you finish the recording, you can watch it and choose to retake it or add it to your project. The webcam and screen recordings go in separate tracks, so you can adjust the position and size of each video feed to your liking after the fact.
Filters and effects
Finally, on the right-side pane, you're going to see a set of filters and effects you can apply to your content in the timeline. The options available depend on the type of content you select, so some options are only available for video files, while others are only available for audio.

Here's a quick rundown of all the options available here:
- Adjust colors (available for video, image, and text assets) - Change properties such as exposure, saturation, and contrast for the selected asset.
- Audio (available for audio assets or videos with an audio track) - This lets you change the volume of the audio track in the final video. You can lower the volume for background music while keeping your voice higher, for example.
- Colors (available for text assets) - Change the color of the text and background.
- Fade (available for all asset types except transitions) - Set fade-in and fade-out animations for the item you selected.
- Filters (available for video, image, and text assets) - Add filters to change the appearance of the image or video file. Some filters require an Essentials plan.
- Speed (available for video assets and motion graphics) - Change the playback speed of the file.
- Text (available for text assets) - Change the text, font, and alignment of a text asset.
- Transform (available for text assets) - Change the size and position of a text asset. Note that you can also drag the text in the video preview to move it around.
- Transition (available for transition assets) - Change the transition animation and duration.
Exporting your project
Once you've made all the edits you want to make to your video, the last step is exporting it, which is fairly straightforward. At the top of the Clipchamp window, there's an Export button you can click. You can export videos in 480p, 720p, or 1080p resolution, or you can also export them as GIFs if they're less than 15 seconds long. Members of the Essentials plan can also export in 4K resolution.

Clipchamp also detects if there are gaps in your video with no visual assets and warns you before you export the video, which can save you from having to re-edit the video later. Once you choose the output resolution, the export will start and it will automatically be downloaded to your computer.

You can also save it to a cloud storage service or upload it straight to YouTube, TikTok, or Pinterest.
And that's about all the basics you need to know if you're using Clipchamp for the first time. This is certainly a more basic video editor compared to tools like Adobe Premiere or DaVinci Resolve, but on the flip side, it's fairly easy to get to grips with and you can still make engaging videos this way. It's a great tool for beginners, though it may not quite cut it for proficient video editors. One thing to note about video editing is that, depending on the kind of video you're making, you might need a pretty high-end laptop. We have a list of great laptops for video editing if you're looking for a new machine.
If you're interested in learning about other recent features in Windows 11, maybe take a look at everything that's new in Windows 11 version 23H2. The update is currently rolling out and it contains a lot of new features and changes.