
Lenovo's ThinkPad T14 Gen 3 is a fantastic business laptop, and it brings some premium features to the company's more mainstream devices. The latest generation comes with the latest Intel and AMD processors, a taller 16:10 display, and an optional 1080p webcam so you can look your best during online meetings and calls. These are all welcome features, but one thing that business users often appreciate is being able to upgrade or repair a laptop relatively easily. If you're wondering whether the RAM and storage can be upgraded on the Lenovo ThinkPad T14 Gen 3, the answer is complicated.
The storage on the Lenovo ThinkPad T14 Gen 3 is upgradeable, as it comes in the form of a standard M.2 2280 SSD. However, the RAM is tricky. On the AMD models, all of the RAM is soldered onto the motherboard, but on the Intel version, one of the memory modules is slotted and it can be replaced. Here's how you can replace both of these components.
What you'll need
Before you get started, there are some things you'll need to have in order to work inside your laptop. Opening the laptop should be fairly easy, and all you'll really need is a Philips screwdriver - having an iFixit toolkit is a good idea if you plan open electronics frequently - and an anti-static wrist strap to prevent any static discharges that might break your laptop.
Once you have the equipment, you'll also want to disable the built-in battery inside the laptop, which will stop current from running inside while you replace the components. To do this, you'll first want to disable fast startup in Windows. Here's how to do the whole process:
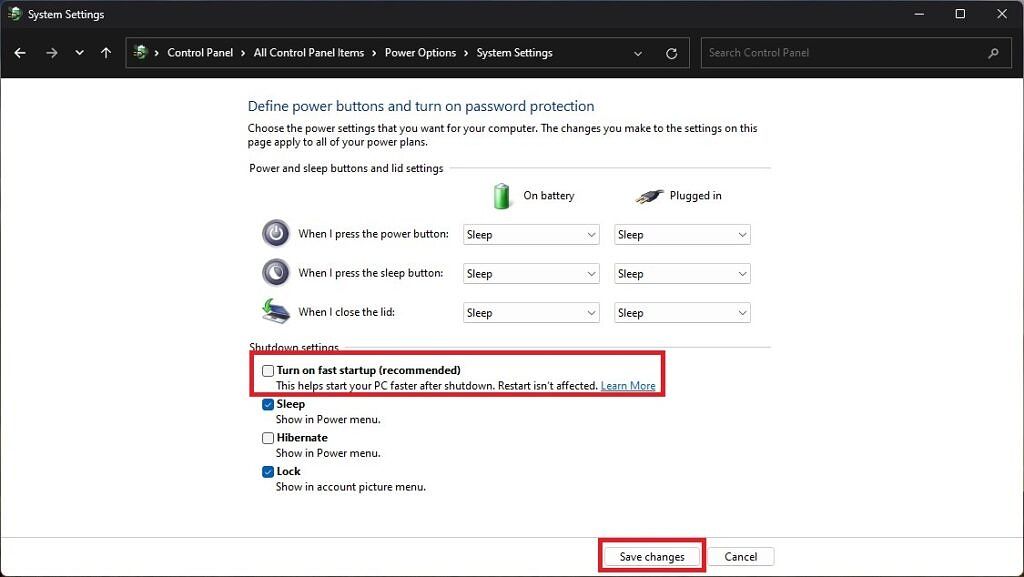
- In Windows, go to the Control Panel and change the view to Large icons or Small icons. The quickest way to access the Control Panel is to search for its name in the Start menu.
- Choose the Power options item and then click Choose what the power buttons do on the left-side menu.
- Here, click Show options that are currently unavailable (you'll need to have administrator privileges). Click Yes in the prompt window that appears.
-
Uncheck the Turn on fast startup box, then click Save changes.
- Restart your PC and press F1 on your keyboard immediately when you see the Lenovo logo in order to access the UEFI BIOS settings.
- Go to the Config section, then choose Power, and finally Disable built-in battery. Confirm your changes and the laptop will turn off.

Once this is all done, make sure to unplug your laptop from the charger for a few minutes before starting. Once you've done your upgrades, make sure to come back and follow these steps to re-enable these features again.
Upgrading or replacing the RAM (Intel models only)
As we've mentioned above, the RAM can only be replaced or upgraded in the Intel-powered models of the Lenovo ThinkPad X1 Yoga. Additionally, only one of the memory modules is upgradeable, and the other is soldered onto the motherboard. If you want to upgrade it, though, we'll show you how. First things first, you'll need to buy a memory module, and the Lenovo ThinkPad T14 uses DDR4 RAM clocked at 3200MHz, so it's ideal to match the original specs. We recommend the Crucial RAM below, which has the same specs and goes up to 32GB capacities.

Crucial DDR4 RAM 3200MHz (32GB)
This stick of RAM can help speed up your computer, especially if you tend to have a lot of apps open at the same time.
Once you have the equipment, here's how to install it:
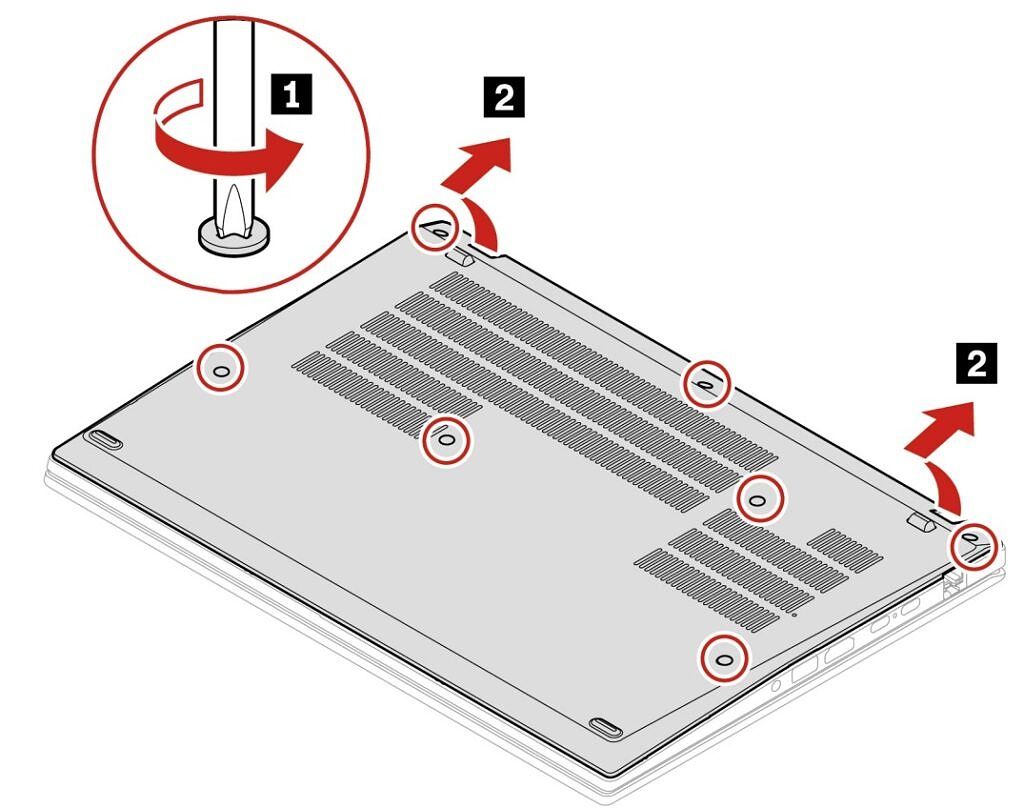
- Lay the laptop on a flat surface with the lid facing down and the hinge facing away from you.
-
Use the Philips screwdriver to remove the seven screws holding the base cover in place. Once you've removed the screws, lift the base cover from the top to remove it.
-
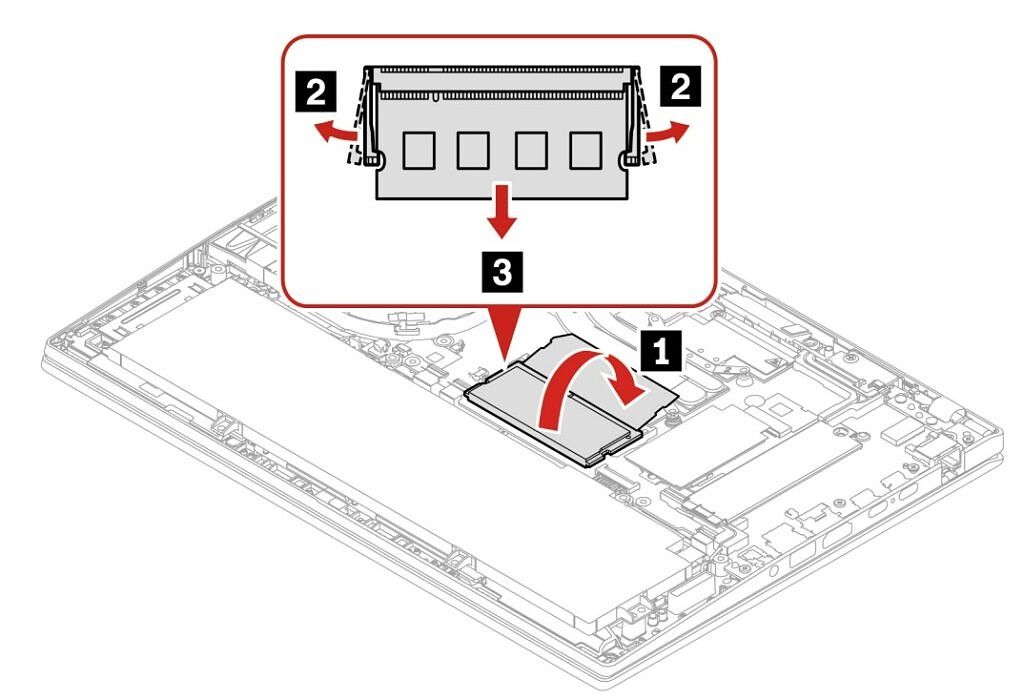
The removable memory module will be under a small flap right above the internal battery. Depending on your configuration, you may or may not have a memory module already installed. Lift the flap to check if there is one.
-
If a RAM module is already installed, carefully pull the tabs on the sides of the memory module to release it, then pull the memory module out of the slot.
-
If a RAM module is already installed, carefully pull the tabs on the sides of the memory module to release it, then pull the memory module out of the slot.
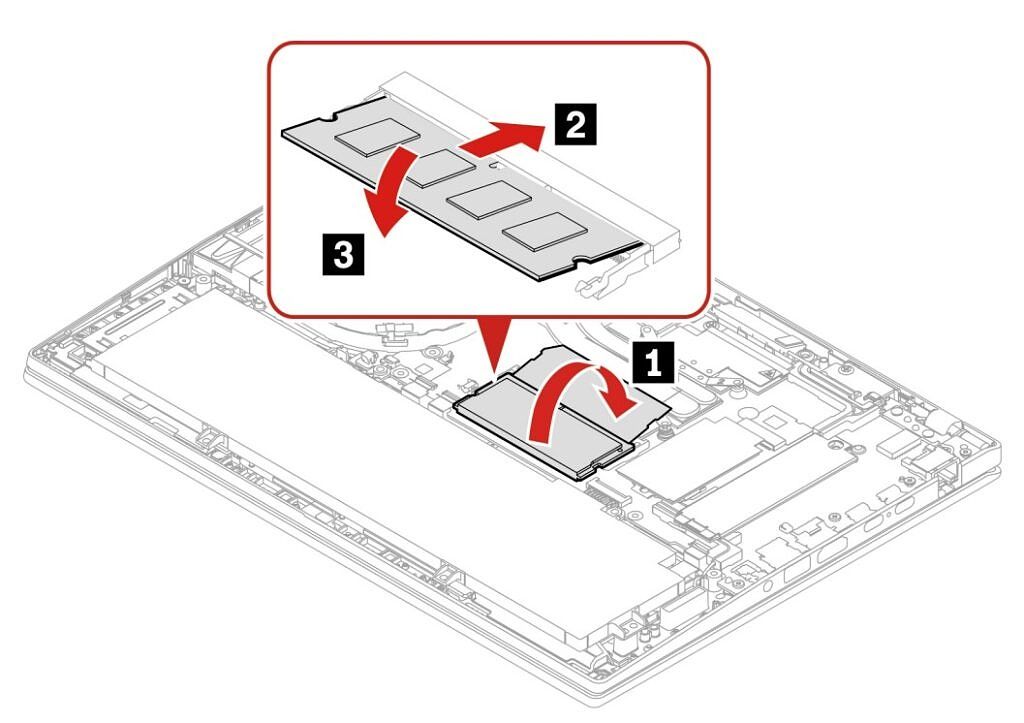
- Take your new RAM stick and align the notch in the connector with the tab inside the memory slot. Carefully slide the RAM stick into the slot at a slight angle. Gently push down the other side of the RAM stick until it locks into place.
-
- Re-attach the base cover and tighten all the screws. Be careful not to overtighten them, as it can exert pressure on the motherboard and cause damage.


Upgrading the storage in the Lenovo ThinkPad T14
If what you're interested in upgrading is the storage inside the Lenovo Thinkpad T14, we have you covered, too. To get started, you'll first need an SSD to replace your current one. We recommend the Samsung 980 PRO if you want the best speeds to leverage the PCIe Gen 4 support on the laptop:

Samsung 980 Pro 1TB
The Samsung 980 Pro SSD supports PCIe Gen 4 with speeds up to 7,000MB/s and it's one of the best SSDs on the market.
Note: Before you start this whole process, keep in mind that replacing the SSD means you'll no longer have any data on your PC, including the operating system. Back up your personal files to a cloud storage service like OneDrive or an external USB drive, then follow our guide on how to install Windows 11 to create installation media. You'll need a USB drive for this, and it has to be different from where you backed up your personal files.
With that out of the way, let's get into what you need to do to upgrade the SSD on your laptop. Unlike the RAM, both Intel and AMD models of the Lenovo ThinkPad T14 let you upgrade the storage, but the internal designs are slightly different, so we'll include images for both below.
- Lay the laptop on a flat surface with the lid facing down and the hinge facing away from you.
- Use the Philips screwdriver to remove the seven screws holding the base cover in place. Pull the base cover from the top to remove it.
-
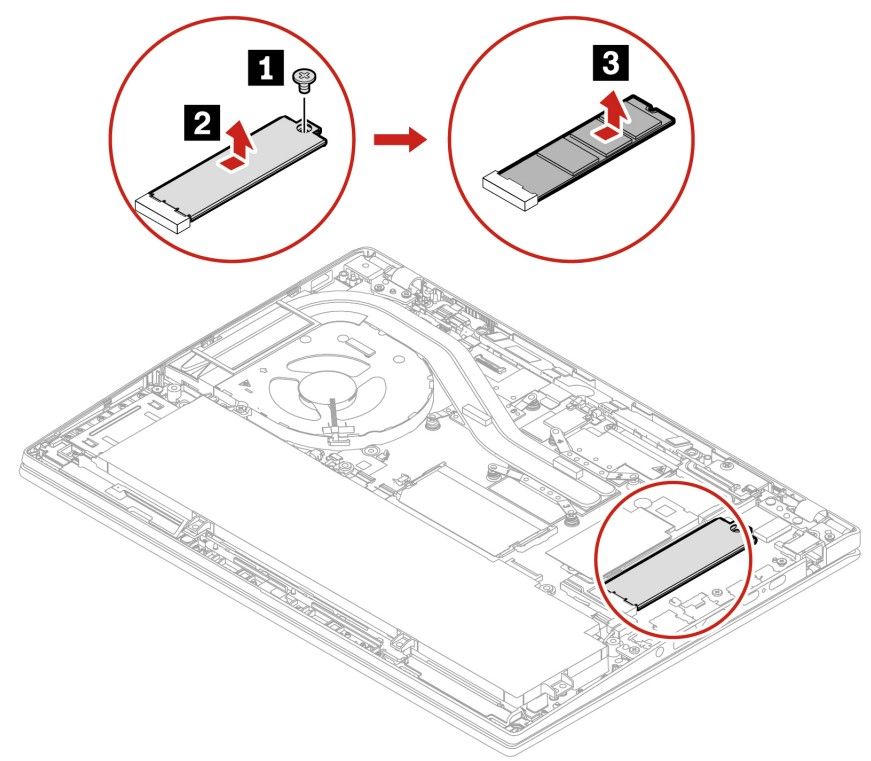
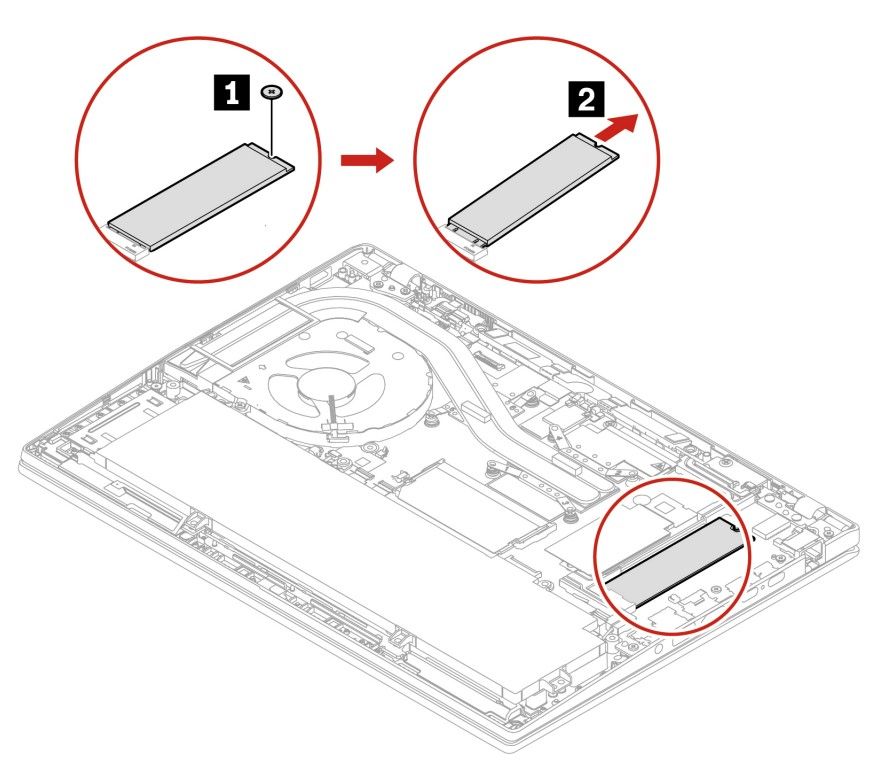
The RAM module will be on the right side of the laptop, slightly above the battery. It may or may not be under an SSD bracket depending on your model.
-
If there's an SSD bracket: Remove the screw holding the bracket in place, then pull the bracket out to expose the SSD. Pull the SSD out of the slot.
-
If there's no SSD bracket: Remove the screw holding the SSD in place, then slide it out of the M.2 slot.
-
If there's an SSD bracket: Remove the screw holding the bracket in place, then pull the bracket out to expose the SSD. Pull the SSD out of the slot.
- Take your new SSD and align the pins and the notch on the connector with the same notch on the M.2 slot on your laptop. The SSD's label should be facing up. Then, slide the memory module into the slot.
-
To secure the SSD in place:
- If your laptop has an SSD bracket: Take the SSD bracket and place it over the SSD, aligning the screw hole on the bracket with the one on the SSD and the motherboard.
- If your laptop doesn't have an SSD bracket: With the SSD lined up with the screw hole on the motherboard, tighten the screw to hold it in place.
- Close up the laptop and re-attach the base cover using the included screws.


With that, you should be good to turn on the laptop again. Since the SSD will have no data, you'll need to plug in the USB drive you used to create the Windows 11 installation media as we mentioned above. You can then install Windows (refer back to our guide to install Windows 11) and access your backup drive to get all your files back. You will also want to go back into your BIOS settings to re-enable the built-in battery.
And that's all you need to know to upgrade the RAM and storage on the Lenovo ThinkPad T14 Gen 3. You don't get the same degree of repairability as some larger laptops offer, but these steps could still help you extend the longevity of your laptop.
If you want to buy the Lenovo ThinkPad T14 Gen 3, you can do so below. At writing time, only the Intel model is available to buy, and the AMD version is expected to launch in June. If you want to check out other options, stop by our list of the best laptops in general - there are some fantastic devices out there.

Lenovo ThinkPad T14 Gen 3
The Lenovo ThinkPad T14 Gen 3 is a business laptop powered by Intel 12th-gen or AMD Ryzen 6000 processors. It has a 16:10 display, lots of ports, and it nails all the basics for businesses.