The Lenovo ThinkPad X1 Yoga Gen 7 is one of the best business laptops you can buy in 2022. It builds on what was already a popular choice for business users, but it ups the ante in a few ways, including new Intel processors with a 28W TDP, faster LPDDR5 RAM, and more. This is still very much a business laptop, though, and one thing customers usually want from those is the ability to upgrade or replace components after the fact. If you want to upgrade the RAM and/or SSD storage on the Lenovo ThinkPad X1 Yoga, we have good and bad news for you.
While the storage on the ThinkPad X1 Yoga comes in the form of a typical M.2 2280 SSD, the RAM is soldered onto the motherboard. That means storage is upgradeable, but the RAM is not, and you should choose the right capacity at checkout. That's not too different from most of the best laptops out there, considering this is a common sacrifice in order to get devices to be as thin and light as possible. However, it may be a little disappointing compared to bigger business laptops.
How much RAM should you get?
Since you can't upgrade it later on, you'll want to make sure that the RAM you add to the Lenovo ThinkPad X1 Yoga is enough to serve you well for as long as you plan to use the laptop. Lenovo offers three configurations - 8GB, 16GB, or 32GB. Out of these, our general recommendation would be 16GB, but it will depend on your usage.

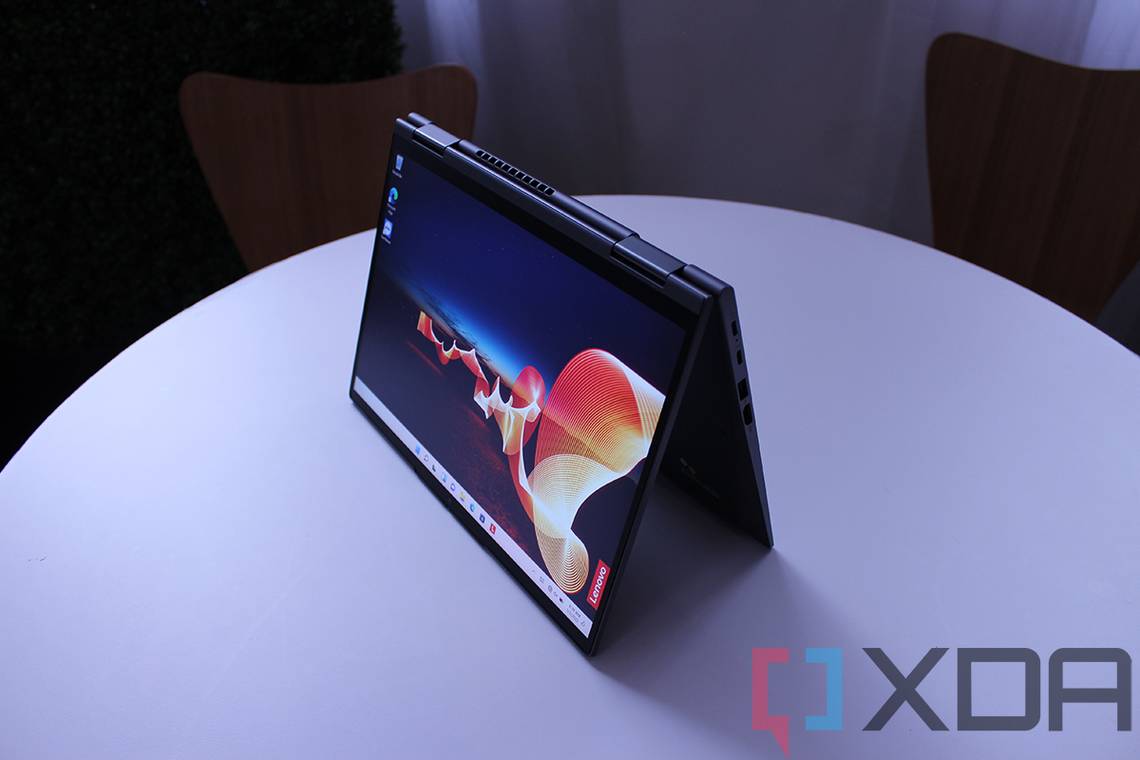
Lenovo ThinkPad X1 Yoga Gen 7
The Lenovo ThinkPad X1 Yoga Gen 7 is a powerful convertible with 12th-gen Intel processors and up to 32GB of LPDDR5 RAM, which is soldered onto the motherboard.
We'd argue that 8GB is just too little these days. Windows 11 alone requires 4GB, and working with just 8GB nowadays can deal a big blow to multi-tasking performance. Modern browsers use a lot of RAM, for example, so if you have a ton of tabs open, you might notice slowdowns. That also goes for having various different apps open, as well as apps that load large sets of data from memory. That can include databases among other things.
On the other hand, 32GB is arguably more than most people will need. With 16GB, the vast majority of users should be able to work on documents, browse the web, and do almost anything without much of a problem. Having 32GB is obviously better, but it's an expensive upgrade, so we'd only recommend it if you know you truly need that much.
How to upgrade the SSD in the Lenovo ThinkPad X1 Yoga
As for the storage, upgrading requires the steps you might expect. To get inside the ThinkPad X1 Yoga, you'll need a Philips screwdriver (an iFixit repair kit will include all the tools you need for this and most other laptops), along with some safety measures. First, we'd recommend wearing an anti-static wrist strap to make sure you're grounded, and also avoid working in environments with fabric or fur that can generate static electricity.
Aside from that, you'll also want the new SSD, and since the ThinkPad X1 Yoga supports PCIe Gen 4, we recommend something like the Samsung 980 Pro. It offers some of the fastest speeds you can get and it's reliable, so you can't ask for much more.

Samsung 980 Pro 1TB
The Samsung 980 Pro SSD supports PCIe Gen 4 with speeds up to 7,000MB/s and it's one of the best SSDs on the market.
It's worth noting at this point that if you replace the SSD, you won't have any of the data currently on your PC. Back up your data to an external drive or a cloud service like OneDrive, then follow our guide on how to install Windows 11 to create USB installation media (this should be different from your backup drive) before you make any changes to your PC.
Once you have everything you need, you might want to start by disabling the battery inside the ThinkPad X1 Yoga, in addition to making sure the laptop is turned off and unplugged. This helps prevent current from running through the machine and avoid static discharges while you're working inside the laptop. To disable the battery, follow these steps:
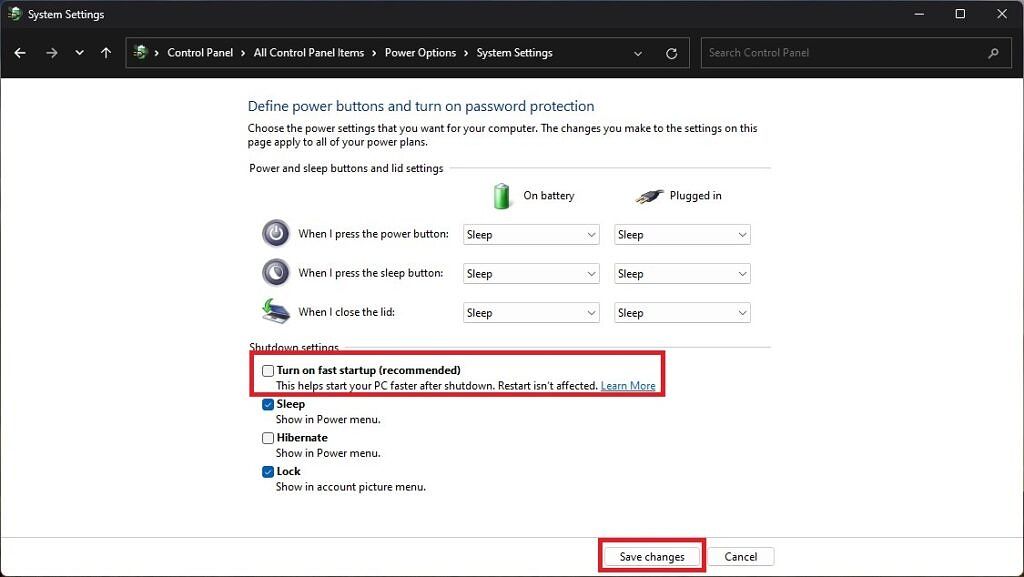
- Open the Control Panel, and change the view to either Small icons or Large icons, then click Power options.
- On the menu on the left side, click Choose what the power buttons do.
- Click Change settings that are currently unavailable. You'll need administrator privileges for this to work.
-
Clear the checkbox for Turn on fast startup (recommended), then click Save Changes.
- Reboot your computer and quickly press F1 when you see the Lenovo logo to get into the UEFI BIOS settings.
- Navigate to the Config section and choose Power, then Disable built-in battery. Confirm your choice and the laptop will turn off.

With all the preliminary stuff out of the way, you can finally replace the SSD. Here's how you can do that:
-
Lay the laptop upside down with the hinge facing away from you and, using the screwdriver, remove the five screws holding the bottom cover in place.
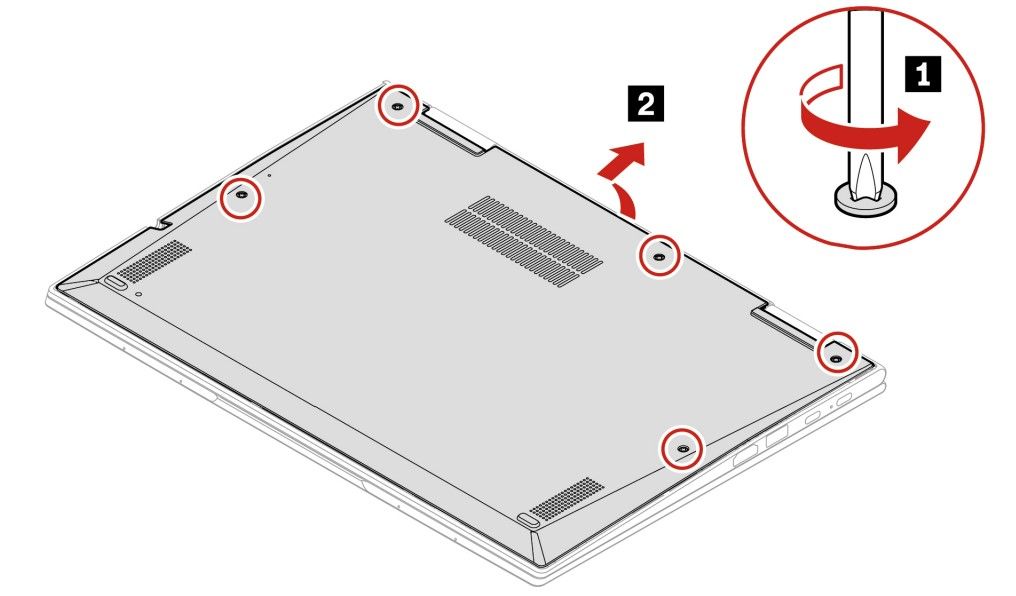
- Remove the bottom cover by lifting from the top. You may need to use a prying tool to separate it from the rest of the chassis.
-
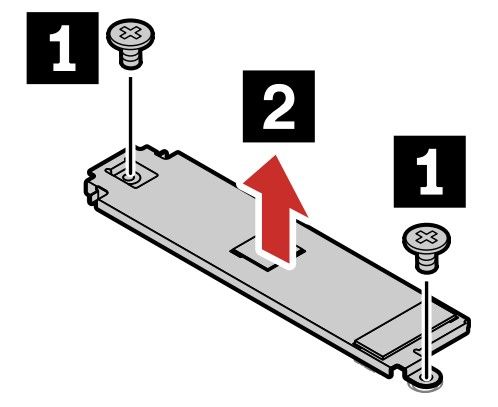
The SSD is near the middle of the laptop, just above the battery. It's protected by an SSD bracket, which is held in place by two screws. Remove the two screws and lift up the SSD bracket.
-
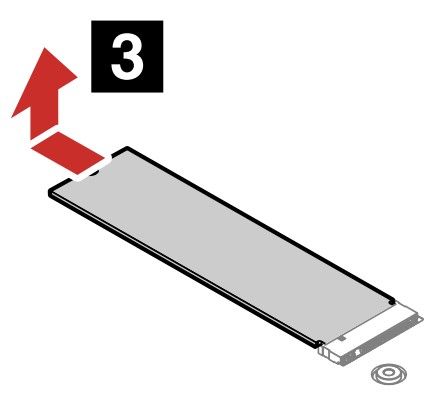
The SSD will be exposed, and you can slide it out of the M.2 slot.
- You will also want to remove the thermal pad underneath the SSD. You should be able to peel it off easily.
- Take your new SSD and align the notch in the connectors with the notch on the SSD slot, then slide it in at a slight angle. The SSD's label should be facing up.
- Place the SSD bracket over the SSD and align it with the screw holes on the motherboard. Tighten the screws to secure the SSD in place, but be careful not to overtighten them.
- Attach the bottom cover as it was originally and use the five screws to secure it back in place. Again, try to avoid overtightening them, as excessive pressure can damage the motherboard.


And that's about all you need to know about upgrading the SSD on your Lenovo ThinkPad X1 Yoga Gen 7. Once your computer is in one piece, you can follow the steps above in reverse order to enable the battery and the fast startup feature. You can also refer back to our guide to install Windows 11 on your new SSD using the installation media we mentioned above.