Windows 11 brought with it a ton of changes, not only with the initial release, but with subsequent updates like version 22H2 and, most recently, version 23H2. One of the big changes we saw at the Start was a modernized Paint app. At first, this was only a fresh look, but Microsoft has added a few notable features in recent updates, including background removal and support for layers. Let's take a closer look at Paint in Windows 11.
Paint in Windows 11: Overview
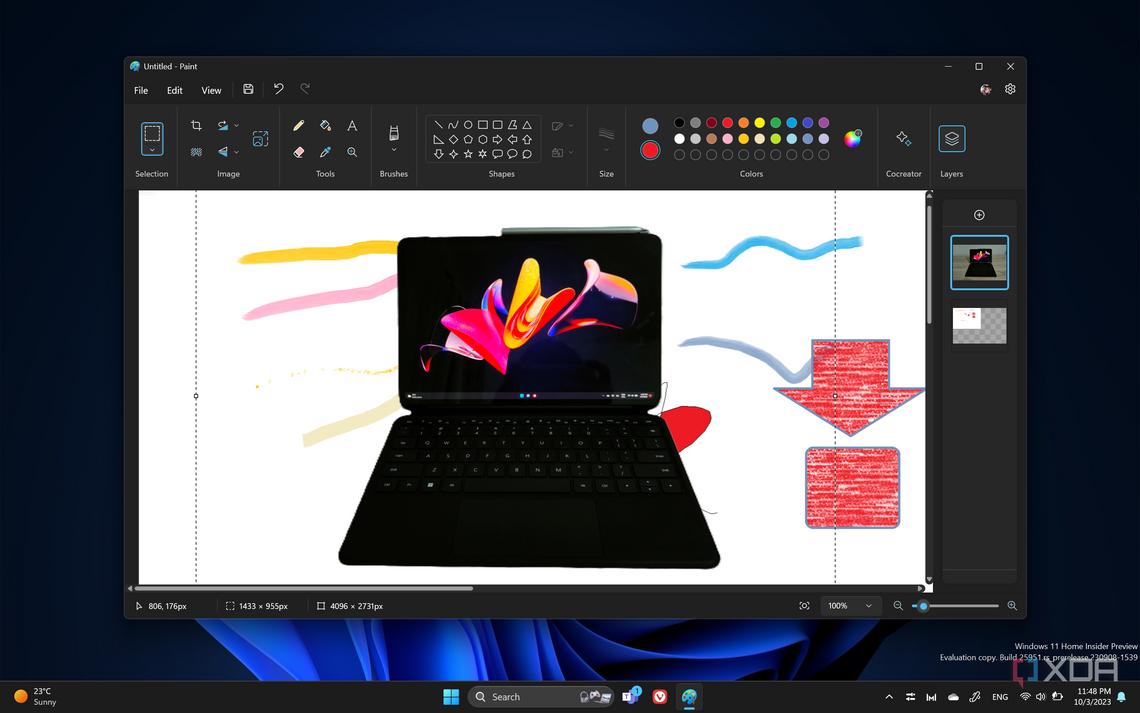
The new Paint app will likely feel familiar the moment you open it, but it also looks quite a bit different from versions prior to Windows 11. UI elements have been rounded and icons are now more modern, with a cleaner look overall.

Everything is mostly where it used to be, but a few minor tweaks and new icons give everything a new look. Let's start from the top: The Save, Undo, and Redo buttons all live alongside the File and View menu options, as well as the new Edit button. Also, all these buttons are now simple dropdown menus rather than taking up a lot of valuable space in the UI.
That toolbar looks quite different from what it did on Windows 10, too. Every option has been given a new icon, and options are now laid out across the toolbar to make them easier to spot. The selection tool now has its own section in the top left, and controls for resizing, cropping, flipping, or rotating an image are all separated and easier to spot at a glance. You'll also see a new icon here for background removal, which we'll touch on later.
All the dropdown menus have new designs that make options easier to find and identify more quickly, including brush styles and sizes, and much more. Otherwise, these are all the tools you're familiar with, with the exception of the new Layers button on the far right.
A couple of smaller changes you may also have noticed is that the canvas in Paint is now centered instead of aligned at the top left corner, and the app finally supports dark mode in Windows 11. At the bottom of the Paint window, you'll see improved controls for zoom, too.

The zoom slider now supports smooth granular zoom, and you can use the buttons next to it to choose a specific level or zoom to fit the screen.
How to use the tools in Paint
Paint offers many tools you can use to draw or make simple images. Most of these have been around for a long time, but there are some new ones exclusive to Windows 11. Let's take a close at the tools available.
Selection tool

The selection tool is fairly straightforward. It Lets you draw an area, in either Rectangle or Freeform modes, inside the canvas you want to select, which you can then copy or cut to use somewhere else or simply move it around in the image. To move a selected area, you need to copy/cut and then paste it first, then drag the selected area around.
You can also use the selection menu to invert the selection once you've drawn a shape, or simply select all to select the entire image.
How to use image tools and background removal

The image tools allow you to manipulate the entire image in a few ways. There are a few tools under this section:
- Resize and skew: The largest button in this section lets you change the resolution of the image and skew it so it looks tilted in either direction.
- Crop: Allows you to crop the image to the selected area (using the selection tool)
- Rotate: Rotates the image in either direction
- Flip: Mirrors the image along the vertical or horizontal axis
A recent addition to this section is background removal. Basically, in a photo or image, Paint can now use AI to identify the primary subject of a photo and remove everything else from the background. All you need to do is have a photo open and click the background removal button, and the magic will happen automatically.
Now, you can create your own background for the image, or use the main subject for a different image entirely. This is one of the biggest changes to paint in many years.
How to draw, paint, and fill in Paint
Most of the tools for drawing and painting are the same in Windows 11. The basics are all here, including the pencil, paint bucket, and brushes. You can also select colors for the tools you use with the respective panel on the right.
The Pencil is a simple drawing tool that lets you draw a line in any form or shape you want. You can't apply any cool effects, but it's effective for simple drawings. Below it is the Eraser tool, which erases whatever you click.

The Fill (paint bucket) tool lets you fill any continuous space of a solid color with a different color. Simply select the color to use and click the area you want to paint, and it's done. There's also the Color picker tool below it which lets you choose a color already in the image.
We'll skip over the Text button for now, and after that we have brushes. Brushes let you draw any shape or anything you want, similar to the pencil, but with brushes, you can choose a variety of different styles for the lines you draw. If you click the arrow under the Brushes button, you'll see a list of options to choose from, and the lines you draw will look like the examples you see.

Then, there are Shapes, which are fairly self-explanatory. There are a few shapes to choose from, and after choosing one, you can click and drag on the canvas to draw that shape in any size you want. On the right side of the list of shapes, you also have the Outline and Fill buttons, which let you choose the style of the outline and fill for the shape you draw.

Finally, we have the list of colors, as well as the color wheel for more advanced color choices. You can click on any color to choose it or use the color editor to get something more specific. On the left side of the color palette, you'll see your currently selected colors.

The top color is used for most elements, while the bottom color is what you'll see in the fill color when drawing a shape.
How to add text in Paint
Most of the tools we've mentioned work the same as previous versions, but the text tool has been revamped significantly in Paint for Windows 11. When you click the Text button (in the Tools section), you can then click anywhere on the canvas to create a text box.

You'll then see a set of text tools appear in a dedicated toolbar below the main one, whereas in the past, text tools used to take over the rest of the UI. You can choose the font, font size, and a handful of other formatting options. One new addition in Windows 11 is the ability to choose the text alignment relative to the text box, rather than being locked to the left side.
How to use layers in Paint
Currently only available for select Windows Insiders, Paint for Windows 11 has one more major new feature, and that's support for layers and proper transparent images. Layers let you add and manipulate different parts of the image separately and bring together transparent images to compose one final image more easily. It's not on the same level as something like Adobe Photoshop, but it's very useful.

When you click the Layers button at the far right of the toolbar, you'll see a vertical strip on the right side of the Paint window showing the layers in your image, which will likely only be one for a new project. You can click the + (plus) button to create a new layer.
To draw or add elements to a specific layer, you have to select that layer in the strip on the right. You can also change the order of layers to change which layers are on top of which. The layer at the top of the strip will be laid on top of all the others, and so on. You can use all the tools you'd normally use in each of the layers.
You can also click File and then Import to canvas to add a new image to your current project. One cool thing about layers is that you can always use the background removal feature and it only applies to that specific layer, so if you add a whole photo but you only want the main object from it, you can still click the Background removal button to remove the distractions.
You also have the ability to merge layers or delete them by right-clicking them in the vertical strip on the right. You can also hide certain layers from view so you can see what the image looks like with and without that layer.
As you can tell, Paint has evolved a lot in Windows 11, and it's far more capable (and prettier) than it ever was on previous versions of Windows. It could be a legitimately useful tool for a lot of people now. Microsoft is also working on a feature called Cocreator, which uses AI to generate images based on your prompts, but currently, you have to join a waitlist for it, and it won't be a free service forever.
If you'd like to learn more about other great tools in Windows 11, check out how to use File Explorer.